---
title: Client-side tracking with Google Tag Manager (GTM)
description: "Raptor tracking records how visitors interact with your website, such as which products they view, add to the basket and purchase. Raptor uses this data to give each visitor more relevant product recommendations.\n\nWith Google Tag Manager (GTM), you can set up Raptor tracking without changing your website's code. Raptor provides two ready-made tag templates in the GTM Community Template Gallery. This article walks you through the setup step by step."
---
[Skip to content](https://content.raptorservices.com/help-center/client-side-tracking-with-gtm#main-content)
![raptor-qntm-logo\_horizontal\_gradient.png\]](https://content.raptorservices.com/hs-fs/hubfs/raptor-qntm-logo_horizontal_gradient.png?height=40&name=raptor-qntm-logo_horizontal_gradient.png)
Open main navigation
Close main navigation
- [Go to raptorservices.com](https://raptorservices.com/)
[Go to raptorservices.com](https://raptorservices.com/)
Hello. How can we help you?
- There are no suggestions because the search field is empty.
1. [Help Center](https://content.raptorservices.com/help-center?hsLang=en)
2. [Data Management](https://content.raptorservices.com/help-center/data-management?hsLang=en)
3. [Implementing Tracking](https://content.raptorservices.com/help-center/data-management?hsLang=en#implementing-tracking)
# Client-side tracking with Google Tag Manager (GTM)
### What is client-side tracking with Google Tag Manager?
Raptor tracking records how visitors interact with your website, such as which products they view, add to the basket and purchase. Raptor uses this data to give each visitor more relevant product recommendations.
With Google Tag Manager (GTM), you can set up Raptor tracking without changing your website's code. Raptor provides two ready-made tag templates in the GTM Community Template Gallery. This article walks you through the setup step by step.
🔍 **Note:** Looking for a setup in a server-side GTM container instead? See [*Server-side tracking with Google Tag Manager (GTM server container)*](https://content.raptorservices.com/blog/6-advanced-e-mail-automations-that-truly-boost-conversion-rate?hsLang=en).
### Prerequisites
- Access to your website's GTM container (web container).
- Your Raptor **Customer ID**, which you can find in the Raptor Control Panel.
- A cookie consent solution on your website. Raptor tags must only fire after the visitor has given consent.
- Your website pushes e-commerce events to the Data Layer, preferably in the GA4 format (see "*How to make sure your website populates the Data Layer*").
- A basic understanding of GTM: tags, triggers and variables.
### Key terms
**Raptor Main tag**: Loads Raptor on every page and sends a pageview event. All other Raptor tags depend on it.
**Raptor Event Tracking tag**: Sends a specific visitor action to Raptor, such as a product view or a purchase. You create one tag for each type of event.
**Data Layer**: The place where your website makes information available to GTM, such as the product ID and price. The event tags read their values from the Data Layer.
**Parameters (p1, p2, p3 ...)**: Raptor receives every event as a set of numbered parameters. What each parameter contains is specific to your account and is listed on the **Implementing tracking** page in the Raptor Control Panel.
### How to add the Raptor templates to GTM
1. Open your container in GTM.
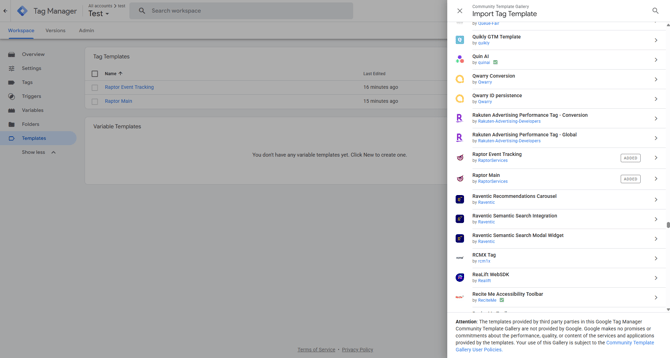
2. Select **Templates** in the left-hand menu.
3. Under **Tag Templates**, click **Search Gallery**.
4. Search for "Raptor".
5. Select **Raptor Main** and click **Add to Workspace**.
6. Repeat steps 3 to 5 for **Raptor Event Tracking**.
Both templates are now listed under **Tag Templates**.
🔍 **Note**: If you already use the Raptor templates, make sure you have the newest version. See [*How to update a Raptor GTM template to the newest version*](https://content.raptorservices.com/help-center/how-to-update-a-gtm-template-to-newest-version?hsLang=en).
### How to set up the Raptor Main tag
⚠️ **Warning**: The Raptor Main tag must only fire after the visitor has given cookie consent. How you set this up depends on your consent management solution.
1. Select **Tags** in the left-hand menu and click **New**.
2. Click **Tag Configuration** and select **Raptor Main**.
3. Enter your Raptor Customer ID.
4. Under **Triggering**, select a trigger that fires on all pages once cookie consent has been given.
5. Name the tag, for example "Raptor Main".
6. Click **Save**.

**Verify the setup**
1. Click **Preview** in GTM and enter your website's address.
2. Accept cookies on your website. **Raptor Main** is now listed under **Tags Fired**.
3. Open the **Live Tracking Stream** in the Raptor Control Panel (**Data Management** \> **Live Tracking Stream**). "pageview" events now appear, as the Raptor Main tag sends one on every page.
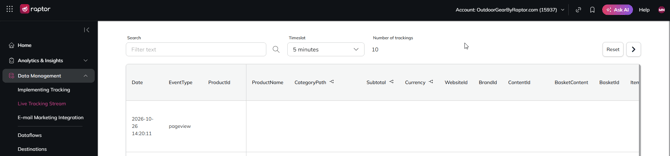
💡 **Example:** To check your consent setup, decline cookies in Preview mode as well. The Raptor Main tag must not appear under **Tags Fired**.
### How to make sure your website populates the Data Layer
The event tags need information about what the visitor did, such as which product they viewed. Your website provides this information by pushing it to the Data Layer. Most e-commerce platforms do this out of the box as part of their Google Analytics 4 (GA4) e-commerce tracking. If yours does not, your web developer can add it.
A GA4 product view pushed to the Data Layer looks like this:
```
dataLayer.push({ event: 'view_item', ecommerce: { currency: 'DKK', value: 12995, items: [ { item_id: '12345', item_name: 'Apple Macbook Pro', item_brand: 'Apple', item_category: 'Laptops', item_variant: 'Gray', price: 12995, quantity: 1 } ] }});
```
The examples in this article use the GA4 format. If your website uses another format, the setup is the same, but the variable paths and field names differ.
🔍 **Note:** To see what your website pushes to the Data Layer, open GTM **Preview**, select an event in the left-hand list and open the **Data Layer** tab.
Google's documentation:
- [GA4 e-commerce events](https://developers.google.com/analytics/devguides/collection/ga4/ecommerce)
- [The Data Layer in GTM](https://developers.google.com/tag-platform/tag-manager/datalayer)
### How to create an event tag
Create one event tag for each type of visitor action you want to track. The example below sets up a product view ("visit") event. All other events follow the same pattern.
1. Select **Tags** in the left-hand menu and click **New**.
2. Click **Tag Configuration** and select **Raptor Event Tracking**.
3. Under **Event Type**, select the event. For this example, select **Product Detail (visit)**.
4. Under **Product Data**, select where the tag finds the product information (see *Choose the source of the product information* below).
5. Under **Parameter Mapping**, map your values to Raptor parameters (see *Map values to Raptor parameters* below).
6. Under **Triggering**, select a trigger that fires when a product page is viewed, for example a custom event trigger for `view_item`. As with the Raptor Main tag, it must only fire after cookie consent has been given.
7. Name the tag. We recommend "Raptor" followed by the event, for example "Raptor - Visit".
8. Click **Save**.

**Event types**
| Event type | Use when | Typical GA4 event |
| --- | --- | --- |
| **Product Detail (visit)** | A visitor views a product page. | `view_item` |
| **Add, Remove or Update Basket (basket)** | A visitor changes the basket content. See *Basket events*. | `add_to_cart`, `remove_from_cart`, `view_cart` |
| **Purchase (buy)** | A visitor completes an order. See *Purchase events*. | `purchase` |
| **Raptor Module Click (itemClick)** | A visitor clicks a product in a Raptor recommendation module. See *Raptor module clicks*. | `select_item` |
| **Set Email Marketing ID (user identification)** | A visitor identifies themselves, for example by logging in. See *Identifying visitors*. | `login`, `sign_up` |
| **Custom Event** | Any other action. Enter the event name in **Event Type Name**, for example `download`. | - |
🔍 **Note:** You do not need a tag for pageviews. The Raptor Main tag sends them automatically.
**Choose the source of the product information**
Product information can reach the tag in two ways. Choose the one that matches your Data Layer.
- **Option A: Product object (recommended).** In GA4 events, all details of a product sit together in the `items` list. Create a **Data Layer Variable** with the name `ecommerce.items.0` (the first product in the list) and call it, for example, "DLV - first item". Select it in **Product Detail Object**. You can then refer to each value by its field name, such as `item_id` or `price`.
- **Option B: Individual variables.** Leave **Product Detail Object** empty and create one Data Layer Variable per value instead, for example "DLV - item name" with the name `ecommerce.items.0.item_name`.

🔍 **Note**: **Product Detail Object** is available for **Product Detail (visit)** and **Custom Event**. For other event types, use option B or the settings described in their own sections below.
**Map values to Raptor parameters**
The standard Raptor events and their parameters are described in [*Tracking Events & Parameters Reference*](https://content.raptorservices.com/help-center/tracking-events-parameters-reference?hsLang=en).
The parameter setup for your own account, including which value belongs in which parameter for each event, is in the Raptor Control Panel under **Data Management** \> **Implementing tracking**.
🔍 **Note**: The parameter setup can differ from account to account. Always use the Implementing tracking page in your own account when you map parameters.
In the tag, click **Add Parameter** under **Parameter Mapping** once for each parameter listed for the event. Each row has three fields:
| Field | What to enter |
| --- | --- |
| **Parameter Type** | **Product object field** if you use option A. **Data Layer variable or constant value** if you use option B or a fixed value. |
| **Parameter** | The parameter number from the Implementing tracking page, for example p2 for the product ID. |
| **Field Name, Variable or Value** | Option A: the field name, for example `item_id`. Option B: click the variable icon and select the variable. For a fixed value, type the value. |
💡 **Example:** Three ways to map p2 (the product ID):
- **Product object field**: enter `item_id`.
- **Data Layer variable**: select the variable that points to `ecommerce.items.0.item_id`.
- **Constant value**: enter the value directly, for example `myId123`.

🔍 **Note:** You do not need to map p1. The tag sets it to the event type (visit, buy, basket and so on) automatically.
**Test the event**
1. Click **Preview** and open a product page on your website.
2. Select the `view_item` event in the left-hand list and check that "Raptor - Visit" is listed under **Tags Fired**.
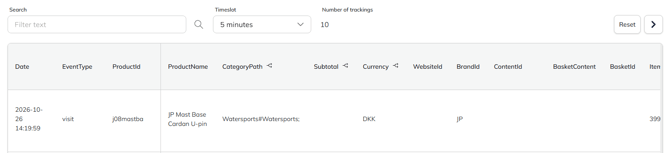
3. Open the **Live Tracking Stream** and check that a "visit" event appears. Compare its values with the product in the Data Layer to make sure every parameter is mapped correctly.
### Purchase events
When you select **Purchase (buy)**, the **Product Detail Object** field is replaced by **Purchased Products Array**.
1. Create a Data Layer Variable with the name `ecommerce.items`, which holds all products in the order.
2. Select it in **Purchased Products Array**.
3. Under **Parameter Mapping**, map each parameter by field name, for example `item_id`, `price` and `quantity`.
4. Under **Triggering**, select a trigger for the `purchase` event.
The tag sends a separate "buy" event to Raptor for each product in the order.
**Calculate subtotal**
When **Calculate subtotal** is selected, the tag calculates the subtotal of each product (price × quantity) and sends it to Raptor.
💡 **Example:** A price of 100 and a quantity of 2 give a subtotal of 200.
The parameters for price, quantity and subtotal are set under **Custom Parameter Mapping**. The defaults are:
- Item Price Parameter Number: 12
- Quantity Parameter Number: 13
- Subtotal Parameter Number: 5
Check the buy event on the Implementing tracking page, and only change these numbers if it lists different parameters.
**Empty the stored basket after the purchase**
Keep **Empty the stored basket after the purchase** selected. Once an order is completed, the basket on your website is empty, and this setting empties the basket stored by the tag as well.
⚠️ **Warning**: If you clear this setting while your basket tags store the basket in the visitor's browser, purchased products are still reported to Raptor as basket content.
### Basket events
Raptor needs the complete basket content with every basket event, not only the product that was added or removed. Most websites only push the product that changed, so the tag can keep track of the basket for you.
Under **Basket Content Source**, select one of two options:
- **Stored by the tag in the visitor's browser (recommended)**: Your website only provides the product that was added or removed. The tag stores the basket in the visitor's browser, updates it with every basket event and sends the complete basket to Raptor as a comma-separated list of product IDs.
- **Provided in the Data Layer**: Your website already provides the complete list of basket products. Map it to the basket content parameter (usually p10) under **Parameter Mapping**, like any other value. The product IDs must be a comma-separated list, for example `1234,4567,3456`.

**Settings when the tag stores the basket**
| Setting | What to enter |
| --- | --- |
| **Basket Action** | The action that triggers the tag: **Add to basket**, **Remove from basket**, **Clear basket** or **Set basket**. |
| **Product ID** | A Data Layer Variable with the ID of the product that was added or removed, for example `ecommerce.items.0.item_id`. Use the same product ID as in your other Raptor events. Shown for **Add to basket** and **Remove from basket**. |
| **Quantity** (default 1) | The number of units added or removed, for example `ecommerce.items.0.quantity`. Leave it empty if the quantity is always 1. The quantity is not sent to Raptor. Shown for **Add to basket** and **Remove from basket**. |
| **Basket Product List** | The complete list of products in the basket, for example `ecommerce.items`. Shown for **Set basket**. |
| **Product ID Field Name** (default `id`) | The name of the product ID field in each product of the list. For GA4, enter `item_id`. Shown for **Set basket**. |
| **Quantity Field Name** (default `quantity`) | The name of the quantity field in each product of the list. Leave empty to count each product as 1 unit. Shown for **Set basket**. |
| **Basket Content Parameter Number** (default 10) | Under **Basket Default Settings**. The parameter for the basket content. Only change it if the Implementing tracking page lists another parameter than p10. |
| **Basket Lifetime in Days** (default 30) | Under **Basket Default Settings**. If the basket has not changed for this many days, the tag starts over with an empty basket. Match it to your webshop's basket lifetime, or enter 0 for no limit. |
⚠️ **Warning**: Do not also map the basket content parameter (usually p10) under **Parameter Mapping** when the tag stores the basket. The tag sets it automatically.
**Recommended setup**
Create one tag per basket action:
| Tag name | Basket Action | Trigger |
| --- | --- | --- |
| Raptor - Add to basket | **Add to basket** | `add_to_cart` |
| Raptor - Remove from basket | **Remove from basket** | `remove_from_cart` |
| Raptor - Set basket | **Set basket** | `view_cart` |
🔍 **Note:** Alternatively, one tag can handle add, remove and clear. In **Basket Action**, select a variable that contains `AddToBasket`, `RemoveFromBasket` or `ClearBasket`. **Set basket** always needs its own tag.
**Set basket**
**Set basket** replaces the stored basket with the complete list of products from the Data Layer and sends the updated basket to Raptor. Use it wherever your website shows the full basket, for example on the basket page (`view_cart`) or at the start of checkout (`begin_checkout`). This keeps the stored basket in sync, even if the basket changed in ways the other basket tags did not register.
🔍 **Note**: The stored basket only reflects changes registered by your basket tags. If the basket can change in other ways, for example when the visitor changes it on another device, add a Set basket or Clear basket tag at the right moment.
💡 **Example**: The Data Layer contains this basket:
```
dataLayer.push({ event: 'view_cart', ecommerce: { items: [ { item_id: '1234', item_name: 'T-shirt', quantity: 2 }, { item_id: '4567', item_name: 'Cap', quantity: 1 } ] }});
```
With **Basket Product List** set to `ecommerce.items` and **Product ID Field Name** set to `item_id`, the stored basket is replaced with 2 units of product 1234 and 1 unit of product 4567. Raptor receives the basket content `1234,4567`.
**How the stored basket changes**
| Visitor action | Basket content sent to Raptor |
| --- | --- |
| Adds 2 × product A | `A` |
| Adds 1 × product B | `A,B` |
| Removes 1 × product A | `A,B` (one unit of A is still in the basket) |
| Removes 1 × product A | `B` |
The tag keeps track of quantities so it knows when a product has been removed completely. Only product IDs are sent to Raptor.
### Raptor module clicks
When a visitor clicks a product in a Raptor recommendation module, Raptor needs to know which module was clicked. This is what makes it possible to measure how your recommendation modules perform.
1. Make sure your website pushes the module name to the Data Layer when a Raptor product is clicked, for example as `raptor_module` on the GA4 `select_item` event.
2. Create a Data Layer Variable for the module name, for example `raptor_module`.
3. Create a tag with the event type **Raptor Module Click (itemClick)**.
4. Select the variable in **Clicked Raptor Module**.
5. Map the product ID and other values under **Parameter Mapping**.
```
dataLayer.push({ event: 'select_item', raptor_module: 'GetSimilarItems', ecommerce: { items: [{ item_id: '12345', item_name: 'Apple Macbook Pro' }] }});
```
🔍 **Note**: The variable must only contain a value when a Raptor module was clicked, and be empty otherwise.
👀 **Use case:** A visitor adds a product to the basket straight from a "Similar items" recommendation module. Select the module variable in **Clicked Raptor Module** on your add-to-basket tag as well. The tag then sends an "itemclick" event before the basket event, so the click is counted too. The click uses the same **Parameter Mapping** as the basket event, so make sure the product ID is mapped there.
### Identifying visitors
When a visitor identifies themselves, for example by logging in, subscribing to the newsletter or completing checkout, you can send their email address or [another unique ID to Raptor](https://content.raptorservices.com/help-center/user-tracking-understanding-soft-ids-hard-ids-raptor-identity-matching?hsLang=en). Raptor encrypts it into a "ReaID" that only Raptor knows. This lets Raptor recognise the visitor later, for example when they click a link in one of your marketing emails, and improves their personal recommendations.
You can send the ID in two ways.
**Option A: With a GTM tag (no code)**
1. Create a new **Raptor Event Tracking** tag.
2. Under **Event Type**, select **Set Email Marketing ID (user identification)**.
3. In **Email Marketing ID**, select a Data Layer Variable that contains the visitor's email address or other unique ID.
4. Under **Triggering**, select a trigger that fires when the visitor is known, for example after login. It must only fire after cookie consent has been given.
5. Name the tag, for example "Raptor - Set Email Marketing ID", and click **Save**.

🔍 **Note**: If the variable is empty, the tag does nothing. This means the tag can also fire on every page and only sends the ID once the visitor is known.
⚠️ **Warning**: With this option, the ID passes through the Data Layer and GTM. To comply with GDPR, make sure it is not sent to Google Analytics. Do not add the variable to your GA4 tags as an event parameter or user property, and exclude it if your setup forwards all Data Layer values automatically.
**Option B: With JavaScript on your website**
If you prefer to keep the ID out of GTM entirely, add this line to your website's code at the point where the visitor becomes known:
```
raptor.push("setEmailMarketingId", "USER_ID_HERE")
```
Replace `USER_ID_HERE` with the visitor's email address or other unique ID. The line only takes effect once the Raptor Main tag has loaded.
### Next step: test your setup
Before you go live, follow [*Testing of Tracking Implementation*](https://content.raptorservices.com/help-center/testing-of-tracking-implementation?hsLang=en) to make sure every event reaches Raptor with the right values.
- [Welcome to Raptor](https://content.raptorservices.com/help-center/welcome-to-raptor?hsLang=en#main-content)
- [Introduction](https://content.raptorservices.com/help-center/welcome-to-raptor?hsLang=en#introduction)
- [Analytics & Insights](https://content.raptorservices.com/help-center/analytics-insights?hsLang=en)
- [Data Management](https://content.raptorservices.com/help-center/data-management?hsLang=en#main-content)
- [Implementing Tracking](https://content.raptorservices.com/help-center/data-management?hsLang=en#implementing-tracking)
- [Implementing Raptor Recommendation](https://content.raptorservices.com/help-center/data-management?hsLang=en#implementing-raptor-recommendation)
- [Email Marketing Integration](https://content.raptorservices.com/help-center/data-management?hsLang=en#email-marketing-integration)
- [The Data Manager](https://content.raptorservices.com/help-center/data-management?hsLang=en#the-data-manager)
- [Streaming API](https://content.raptorservices.com/help-center/data-management?hsLang=en#streaming-api)
- [Destinations](https://content.raptorservices.com/help-center/data-management?hsLang=en#destinations)
- [Customer Data Platform](https://content.raptorservices.com/help-center/customer-data-platform?hsLang=en#main-content)
- [Introduction](https://content.raptorservices.com/help-center/customer-data-platform?hsLang=en#introduction)
- [Profile Unification](https://content.raptorservices.com/help-center/customer-data-platform?hsLang=en#profile-unification)
- [Audience Builder](https://content.raptorservices.com/help-center/customer-data-platform?hsLang=en#audience-builder)
- [Audience Insights](https://content.raptorservices.com/help-center/customer-data-platform?hsLang=en#audience-insights)
- [Calculated Attributes](https://content.raptorservices.com/help-center/customer-data-platform?hsLang=en#calculated-attributes)
- [Activations](https://content.raptorservices.com/help-center/customer-data-platform?hsLang=en#activations)
- [Single Customer View](https://content.raptorservices.com/help-center/customer-data-platform?hsLang=en#single-customer-view)
- [CDP Export API](https://content.raptorservices.com/help-center/customer-data-platform?hsLang=en#cdp-export-api)
- [Website Recommendations](https://content.raptorservices.com/help-center/website-recommendations?hsLang=en#main-content)
- [Introduction](https://content.raptorservices.com/help-center/website-recommendations?hsLang=en#introduction)
- [Recommendation Strategies](https://content.raptorservices.com/help-center/website-recommendations?hsLang=en#recommendation-strategies)
- [Feeds](https://content.raptorservices.com/help-center/website-recommendations?hsLang=en#feeds)
- [Tuning Parameters](https://content.raptorservices.com/help-center/website-recommendations?hsLang=en#tuning-parameters)
- [Working with the Raptor API](https://content.raptorservices.com/help-center/website-recommendations?hsLang=en#working-with-the-raptor-api)
- [Mail Recommendations](https://content.raptorservices.com/help-center/mail-recommendations?hsLang=en)
- [E-mail Triggers](https://content.raptorservices.com/help-center/e-mail-triggers?hsLang=en#main-content)
- [Get started](https://content.raptorservices.com/help-center/e-mail-triggers?hsLang=en#get-started)
- [E-mail Trigger Documentation](https://content.raptorservices.com/help-center/e-mail-triggers?hsLang=en#e-mail-trigger-documentation)
- [E-mail trigger integrations](https://content.raptorservices.com/help-center/e-mail-triggers?hsLang=en#e-mail-trigger-integrations)
- [Site Search](https://content.raptorservices.com/help-center/site-search?hsLang=en#main-content)
- [Search Tracking](https://content.raptorservices.com/help-center/site-search?hsLang=en#search-tracking)
- [Introduction](https://content.raptorservices.com/help-center/site-search?hsLang=en#introduction)
- [Implementing Site Search](https://content.raptorservices.com/help-center/site-search?hsLang=en#implementing-site-search)
- [Search Ranking & Recommendations](https://content.raptorservices.com/help-center/site-search?hsLang=en#search-ranking-recommendations)
- [Reporting](https://content.raptorservices.com/help-center/site-search?hsLang=en#reporting)
- [Merchandising](https://content.raptorservices.com/help-center/merchandising?hsLang=en#main-content)
- [Introduction to Merchandising](https://content.raptorservices.com/help-center/merchandising?hsLang=en#introduction-to-merchandising)
- [Boosted Campaigns](https://content.raptorservices.com/help-center/merchandising?hsLang=en#boosted-campaigns)
- [Customized Feeds](https://content.raptorservices.com/help-center/merchandising?hsLang=en#customized-feeds)
- [AI Models](https://content.raptorservices.com/help-center/ai-models?hsLang=en#main-content)
- [Customer Lifetime Value](https://content.raptorservices.com/help-center/ai-models?hsLang=en#customer-lifetime-value)
- [Administration](https://content.raptorservices.com/help-center/administration?hsLang=en#main-content)
- [Trust Center](https://content.raptorservices.com/help-center/administration?hsLang=en#trust-center)
- [User Management](https://content.raptorservices.com/help-center/administration?hsLang=en#user-management)
- [Operational Insights](https://content.raptorservices.com/help-center/administration?hsLang=en#operational-insights)
- [Data Retention](https://content.raptorservices.com/help-center/administration?hsLang=en#data-retention)
[](https://www.raptorservices.com/)
raptorsmartadvisor.com Help Center
Copyright © 2026, Raptor Services A/S