![raptor-qntm-logo_horizontal_gradient.png]](https://content.raptorservices.com/hs-fs/hubfs/raptor-qntm-logo_horizontal_gradient.png?height=40&name=raptor-qntm-logo_horizontal_gradient.png)
What is filtering?
Filtering lets you control which products are excluded from or included in recommendation module output. Rather than changing the ranking of products, filtering removes them from the results entirely. You can filter by product ID, category, brand, sale status, custom fields, or any other parameter available in your product feed.
There are two approaches: filtering on your own side after receiving the Raptor API response, or using Raptor's built-in OData filter (Open Data Protocol) to exclude products before they are returned.
Two approaches to filtering
Option 1: Filter in your own CMS
You receive the full recommendation output from Raptor and apply your own logic to remove unwanted products before displaying them. This approach requires no configuration in the Raptor Control Panel and gives you full control over the filtering logic on your side.
Option 2: OData filter (filter at the source)
You apply a filter directly in the Raptor Control Panel. Raptor evaluates the filter before returning the API response, so excluded products never appear in the output at all. This is the recommended approach when you want consistent filtering across all touchpoints without relying on CMS-side implementation.
🔍 Note: You can only filter on parameters that are mapped from your product feed. If a field is not included in your product feed, it cannot be used as a filter.
Prerequisites for OData filtering
Before you can use OData filters, two things must be in place:
- A Product Feed configured and connected to your Raptor account.
- Full info enabled in the Control Panel, so that all product feed parameters are available in the API response.
⚠️ Contact your Raptor implementation contact if you are unsure whether full info is active on your account.
OData filter syntax
OData filters use two operators:
- ne (not equal): excludes products that match the value. Use this to remove specific products, categories, or brands.
- eq (equal): includes only products that match the value. Use this to restrict output to a specific subset.
Combine multiple conditions using and to apply more than one filter at the same time.
The table below shows the filter templates and examples for the most common use cases.
| Goal | Template | Example |
| Exclude specific products by ID |
[ProductId] ne '{ProductId}' |
[ProductId] ne '649827' and [ProductId] ne '917263' and [ProductId] ne '154263' |
| Exclude products currently on sale |
[OnSalePrice] eq null |
[OnSalePrice] eq null |
| Exclude a product category | [{Identifier}] ne '{CategoryName}' | [CustomField3] ne 'Decorations' and [CustomField3] ne 'Christmas' |
| Exclude products containing text in a field | not substringof('{text}',[{Identifier}]) | not substringof('santa',[ProductUrl]) |
| Exclude products where a field is set to true | [{Identifier}] eq 'False' | [CustomField4] eq 'False' |
| Exclude products where a field is set to false |
[{Identifier}] eq 'True' |
[Expensive] eq 'True' |
|
Exclude specific brands |
[BrandName] ne '{BrandName}' | [BrandName] ne 'Nike' and [BrandName] ne 'Adidas' |
💡 Example: A retailer running a post-Christmas clearance wants to hide all Halloween and Christmas decoration products from recommendations. They apply: [CustomField3] ne 'Decorations' and [CustomField3] ne 'Christmas'
How to apply an OData filter in the Control Panel
- In the Raptor Control Panel, expand Recommendations in the left sidebar and click Website.
- Find the module you want to filter and click it to open the module page.
- Scroll to the Optional Input Parameters section.
- Locate the ODataFilter field and enter your filter expression.
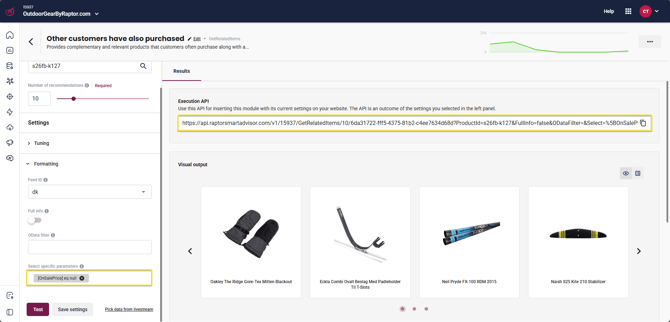
- Enter a test product ID in the Mandatory Input Parameters box and click Test to verify that the filter is working as expected.
- Confirm that filtered products no longer appear in the output, then save the configuration.
🔍 Note: OData filters can also be passed as a query parameter directly in the API call, outside of the Control Panel. This is useful when the filter needs to be applied dynamically, for example when filtering based on the current page context.