Get started with your E-mail Personalization with these 6 steps and FAQ
- Tracking
- Feeds
- Layout Design
- E-mail integration
- Activating the e-mail modules in Raptor
- Creating the modules in your e-mail provider
Tracking
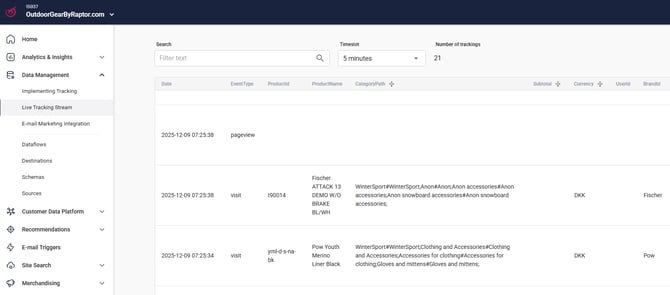
In the Raptor Control Panel, go to Data Management and you will find Implementing Tacking from where you can select the needed implementation documentation.

🔍 Note: Once tracking is implemented, the recommendation engine starts working. After approximately one week, it will provide valid recommendations. Over time, as the data foundation grows, recommendation quality improves as algorithms become more intelligent.
Ensure click handlers are correctly placed. These allow Raptor to detect when a recommendation is clicked. With this in place, you can track direct and assisted revenue, conversion rates, average basket size, and revenue per visit for Raptor users vs. non-Raptor users.
Learn more about how to send Purchase History Data and POS Data to Recommendation Engine.
- Order ID (required)
- Product ID (required)
- User ID
- Subtotal
- Quantity
- Brand
Feeds
Product catalog feeds should be set up early in the onboarding process.
- Supported formats: XML, CSV, or JSON
- Feeds typically provide image URLs and prices.
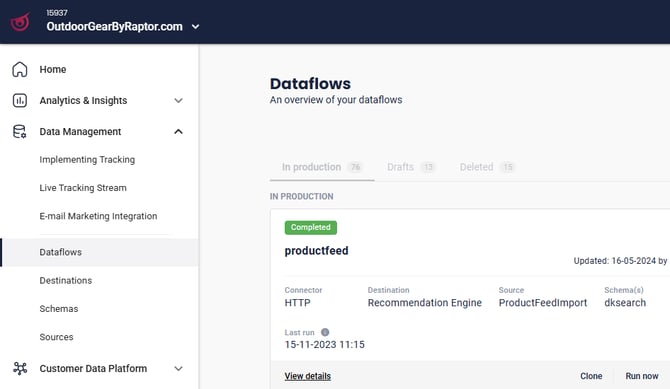
- Set up feeds under Data Management → Dataflows
Go to Data Management and Dataflows to set up the Product Catalog.
Layout Design
- Create your own template
- Use one of Raptor’s pre-built templates
💡 Need a video-tour? Watch our introduction HERE
How to create a layout:
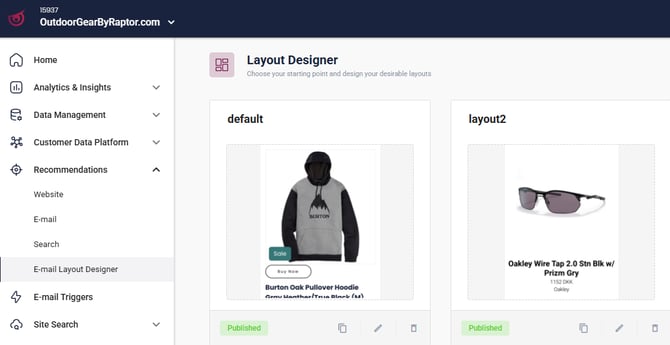
- Go to Recommendations → E-mail Layout Designer
- Click Create Layout
- Choose from:
- Featured product – compares prices
- Horizontal template – for horizontal product displays
- Promotional template – includes a discount label
-
- Blank layout – design from scratch
💡Example: Please read our Technical Guide if you need further guidance.
REAID Synchronization
REAID (Raptor Email Address ID) is used when Raptor integrates with your Email Marketing System.
- Enable email address synchronization when the email address is used as a business key.
- Raptor generates an ID and pushes it to all email contacts to anonymize users and prevent email addresses from appearing in URLs.
Setup:
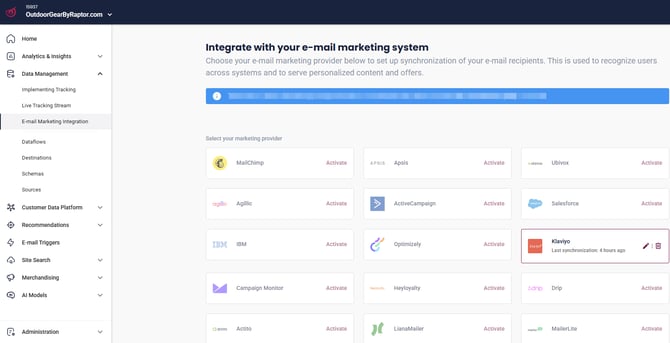
- Go to Data Management → Email Marketing Integration
- Choose your email marketing provider
- Click Activate
- Enter your Email Marketing API Key and Account ID
- Follow third-party integration documentation HERE.
Multi-account setups:
- If multiple Raptor accounts share one email marketing account, set up integration once.
- If your email marketing system has multiple accounts, set up integration for each Raptor account individually.
Synchronization frequency:
- Runs every 24 hours
- First sync occurs ~4 hours after activation
- Some providers allow sync every 4 hours
Insert REAID in tracking:
Include REAID as a UTM parameter in all links sent from your email marketing system. See our Help Article HERE.
👀 Use case: This is used to recognize users across systems/devices and to serve personalized recommendations.
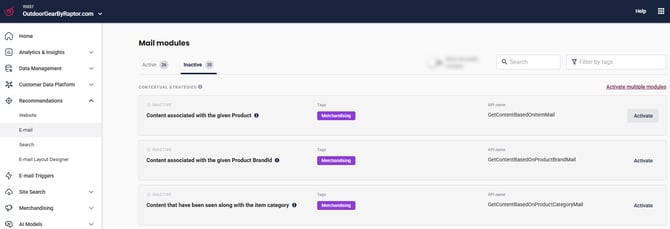
Activating the mail modules
Before activating modules:
- Ensure tracking and email marketing integration are complete.
Steps:
- Go to Raptor Control Panel → Recommendations → E-mail
- Activate the required modules from the inactive panel
Creating the modules in your e-mail provider
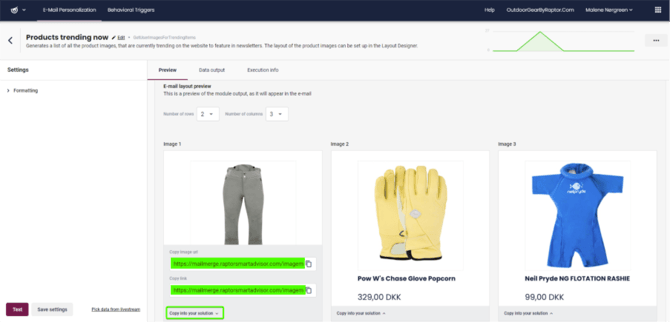
After activation:
- Select the first module and click Test to generate output
⚠️ Warning: When testing a module, make sure you enter the plain (unencrypted) value in the UserId field. If you enter an encrypted value, the test will not return results. Use the raw user ID exactly as it is stored in your system.
- Copy the Image URL from the preview and insert it into your email template’s image placeholder
- Copy the Link URL and insert it into the link address for the same placeholder
-
Repeat for each product image you want to display:
- Continue with Image 2, Image 3, and so on until you reach the desired number of products.
- Important: Update the number in the URL for each image (e.g.,
.../1.jpg,.../2.jpg,.../3.jpg). - Reusing the same URL will display identical recommendations, so each image must have a unique URL.
Example URL structure:
- Image URL:
https://mailmerge.raptorsmartadvisor.com/imagemerge/0/25/15937/dk/1.jpg?rsaOutputType=FullInfo&rsaMailmergeTemplateName=default&rsaMailmergeApiMethod=GetUserImagesForTrendingItems&rsaMailId=YourCampaignId&reaid=&rsaUserId=
- Product URL
https://mailmerge.raptorsmartadvisor.com/imagemerge/1/25/15937/dk/1.jpg?rsaOutputType=FullInfo&rsaMailmergeTemplateName=default&rsaMailmergeApiMethod=GetUserImagesForTrendingItems&rsaMailId=YourCampaignId&reaid=&rsaUserId=
Want to understand how the URL is structured?
This step-by-step guide explains each element of the URL in detail.
This guide in Arcade will help you:
- Understand what each parameter in the URL means
- Learn how the REAID and other dynamic elements work
- See examples of how the URL changes for different images
🗯️FAQ
Q: How are images generated for email recommendations?
The email modules include a built-in cache, which is not enabled by default. Additionally, the image proxy has its own cache, which resets every night at 02:00.
- Testing: Always test personalization features in the Raptor Control Panel, where a ForceReloadAlgorithmCache ensures previews are up-to-date.
- Email marketing systems: Caching is not automatically refreshed in external email systems or via the URLs used in email modules. This means changes in layout or recommendations may not appear immediately in sent emails unless the image is re-requested.
Q: What is “backfilling” and can I configure it myself?
Backfilling refers to adding fallback products to the end of the recommendation list when personalized recommendations aren’t available.
- Configuration: Backfilling is defined within each module and cannot be changed dynamically, as the data sources need to be “warmed up” with new backfilling data. You can typically choose to enable or disable backfilling, but not customize its content.
Q: What is a “candidate set” in the context of recommendations?
The candidate set is the pool of items from which recommendations are selected.
- In Merchandising modules, this is typically a dynamic, behavior-based list (often 50 products) tailored to the user’s activity.
- Boosting actions (e.g., promoting certain items) can only be applied within this candidate set.
- The logic for how the candidate set is defined—including data sources, filters, and attributes—is determined by the module’s configuration.
Q: What’s the difference between OData filters and product filters?
- Product filter: A simple, comma-separated list of item IDs to exclude from recommendations.
- OData filter: A more advanced and flexible query language that allows you to filter recommendations based on any mapped parameter from the Item Schema—not just product IDs.
Use OData filters to remove groups of products from the output, applying complex logic across all available product attributes. While OData filters are powerful, they can be more complex to set up, so a simpler product filter is also available for straightforward exclusions.