![raptor-qntm-logo_horizontal_gradient.png]](https://content.raptorservices.com/hs-fs/hubfs/raptor-qntm-logo_horizontal_gradient.png?height=40&name=raptor-qntm-logo_horizontal_gradient.png)
What are Website Recommendations?
Raptor's Website Recommendations show each visitor the products and content most relevant to them, on every page of your website. Recommendations update in real time as visitors browse, so what they see always matches their current intentions.
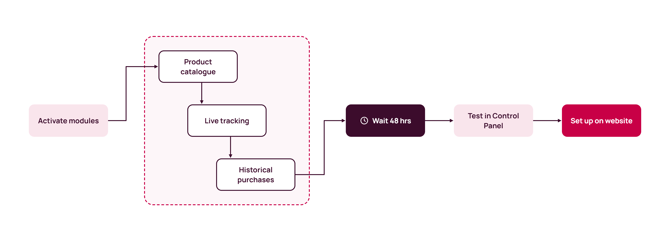
This guide walks you through the six steps from a new account to live modules, in the order we recommend. You work in two places:
- The Raptor Control Panel: where you set up your data, and activate and test modules.
- Your website: where you add the tracking script and display the recommendations.
The six steps at a glance
| Step | What you do | Where |
|---|---|---|
| 1. Product catalog | Connect and schedule your product feed | Data Manager |
| 2. Live tracking | Add the tracking script and events | Your website |
| 3. Activate modules | Choose strategies and turn on modules | Control Panel |
| 4. Historical purchases | Upload one year of past orders | Data Manager |
| 5. Test in the Control Panel | Preview and tune each module | Control Panel |
| 6. Set up on the website | Call the Raptor API and display modules | Your website |
Step 1: Product catalog
Your product catalog tells Raptor which products exist, what they are called and where they link to. It can also hold supporting metadata that your data layer may not include. Raptor uses the catalog to show up-to-date product information in the modules and to leave out products that are no longer available.
You connect your catalog in the Data Manager, which you find in the Control Panel under Data Management.
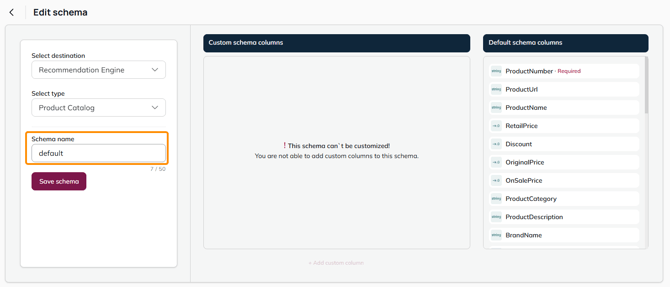
- Create a source and schema. Create a dedicated source for your catalog and select the Recommendation Engine schema. We recommend naming the schema default, as modules look for this name.
- Create a dataflow. Connect your feed using one of the supported methods: HTTP/HTTPS, FTP, SFTP, manual file upload or a connector such as Shopify. The Data Manager supports JSON, XML and CSV.
- Map your fields. Map the columns in your feed to Raptor's schema. As a minimum, map ProductNumber, ProductName and ProductUrl. The Data Manager is case sensitive, so check that your column names match exactly.
- Schedule and activate. Set the dataflow to run on a recurring basis, for example daily, so Raptor always has your latest catalog.
⚠️ Warning: The product IDs in your feed must match the product IDs you send in tracking (Step 2). See Product Data: Choosing the Correct IDs for Website- and Email Recommendations, and Triggers.
For a full walkthrough, see Setting up a Product Catalog for Recommendation Engine.
Step 2: Live tracking
Tracking captures how visitors behave on your website, in real time. This is the data Raptor's algorithms learn from, so the more accurate your tracking, the more relevant your recommendations.
Add the Raptor tracking script to every page of your website, and load it after the visitor has given cookie consent. You can implement tracking in multiple ways. See Introduction to tracking documentation to choose the right one for you.
- Client-side tracking with JavaScript
- Client-side tracking with Google Tag Manager
- Server-side tracking
- Server-side tracking with Google Tag Manager
Website Recommendations need the following events:
| Event | When it is sent | Mandatory parameters |
|---|---|---|
| Visit | A visitor views a product page | EventType, ProductId, ProductName, CategoryPath, BrandId, ItemPrice, StockStatus, MasterId (if your products have variants) |
| Basket | A product is added to or removed from the basket | EventType, ProductId (only when a product is added), BasketContent, BasketId, ItemPrice |
| Buy | A purchase is completed (one event per product) | EventType, ProductId, ProductName, Subtotal, Currency, ItemPrice, Quantity, OrderId |
| ItemClick | A visitor clicks a product in a Raptor module | EventType, ProductId, ModuleName |
| ContentVisit | A visitor views a content page (only if you use content modules) | EventType, ContentId, ContentName, ContentCategory |
See the full list in Tracking Events & Parameters Reference.
⚠️ Warning: Don't skip ItemClick. Without it, Raptor can't see which recommendations visitors click, and you can't measure how your modules perform.
🔍 Note: Safari limits client-side cookies to seven days. To keep recognizing returning visitors, set the Raptor cookie server-side. See ITP workaround: Set Raptor tracking cookies server side
When the script is in place, check your events with Testing of Tracking Implementation.
Step 3: Activate modules
A module is a recommendation strategy placed in a specific spot on your website, such as "Similar items" on the product page. Raptor offers 24 pre-built strategies. You choose which modules to use, and Raptor's algorithms pick the products.
- Go to Recommendations > Website in the Control Panel.
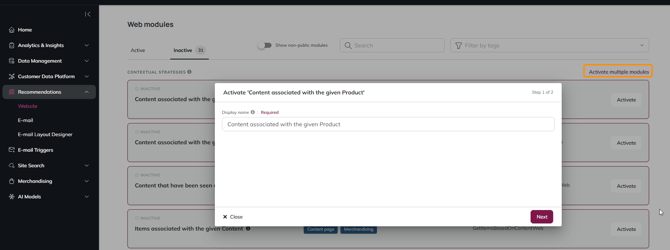
- Pick the recommendation strategies that fit your business and your page types.
- Turn on the matching website modules.
👀 Use case: B2C sites usually benefit most from personal recommendations, trending products and modules that increase basket size. B2B sites often have returning customers who buy the same products again, so highlight frequently purchased items and introduce products they haven't discovered yet. Read more in Know your business model: B2C, B2B and content sites.
A typical e-commerce setup could look like this:
| Page | Example modules |
|---|---|
| Front page | GetUserItemRecommendationsWeb, GetPopularItemsWeb |
| Category page | GetPopularItemsInCategoryWeb |
| Product page | GetSimilarItemsWeb, GetPIMRelatedItemsWeb, GetUserItemHistoryWeb |
| Basket | GetPIMRelatedItemsForBasketWeb |
| Account page | GetUserItemRecommendationsWeb, GetUserItemHistoryWeb |
See all strategies, grouped by goal, in Recommendation strategies: the right products for every visitor.
👀 For more examples, see Best practice: where to place your modules
Step 4: Historical purchases (1 year)
Live tracking normally needs about a week to collect enough data for modules to perform well. By uploading a year of past purchases, your modules can personalize from day one instead.
- In the Data Manager, create a source for your order data and select the Orderline schema.
- Create a dataflow and upload or connect your order export, covering the last 12 months.
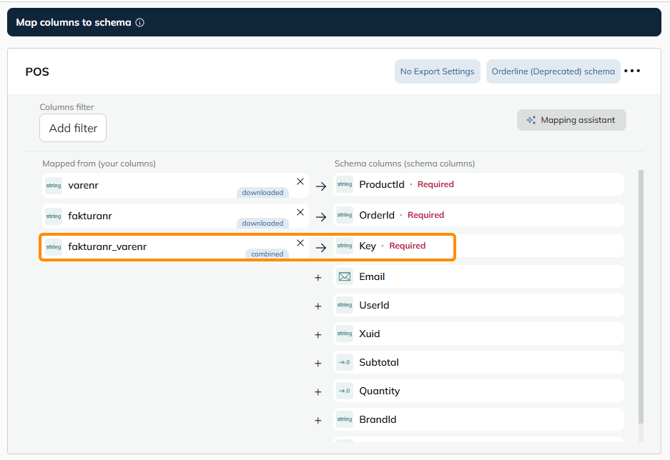
- Map all the columns you have. Every order line needs a unique Key, and any missing fields will lower the value of the data.
- Set the scheduler to Run once, and activate.
🔍 Note: Use the same product IDs as in your catalog and tracking, so Raptor can connect past purchases to your products.
👀 Use case: If you also want to send ongoing point-of-sale data from your physical stores, set up a separate dataflow on a recurring schedule.
For a full walkthrough, see Orderline Schema.
Step 5: Test in the Control Panel
Before a module goes live, preview its output in the Control Panel and check that the recommendations make sense for your business.
- Open the module under Recommendations in the Control Panel.
- Preview the output for a few products, categories or users.
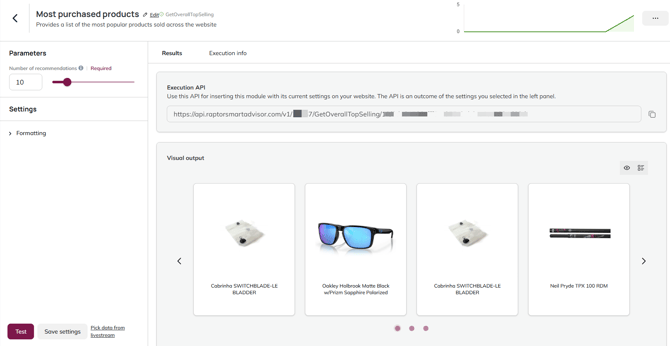
- Adjust the module until you are happy with the result: a. Tuning: change the weighting of, for example, visit history, buy history and merchandising boosts. See Module adjustment and tuning. b. Filtering: leave out products you don't want to recommend, such as out-of-stock items. See Filtering recommendation output. c. Boosting: give selected products or brands a higher priority.
Repeat for each module you plan to use on your website.
Step 6: Set up on the website
The last step is to fetch the recommendations from Raptor and show them on your website. You do this by calling the Raptor API from your site templates, one call per module. You can use any programming language.
- Call the Raptor API. Each module has its own API request, which you find on the module in the Control Panel. A request looks like this:
https://api.raptorsmartadvisor.com/v1/{customerId}/{apiMethodName}/{numberOfRecommendations}/{apiKey}?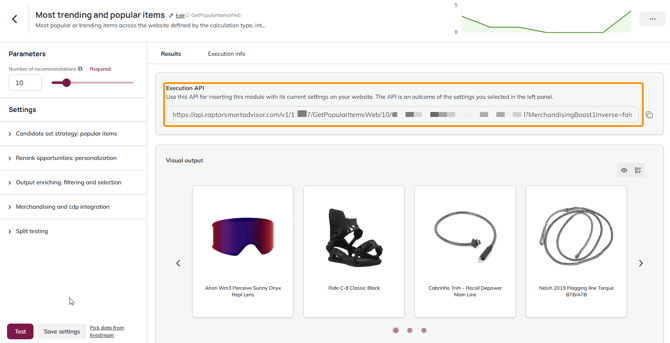
- Display the recommendations. Raptor returns the products as data, not as a finished design. You decide how the module looks, so it matches the rest of your website.
- Track clicks. Send an ItemClick event with the module name whenever a visitor clicks a recommended product (see Step 2).
We have code examples to help you get started:
🔍 Note: Use a timeout and a fallback in your API call, so your page still loads if the request is slow. The C# example shows how.
Before you go live
- The product catalog is active and syncs on a schedule
- The tracking script loads on every page after cookie consent
- Visit, Basket, Buy and ItemClick events are verified
- Product IDs match across catalog, tracking and historical purchases
- One year of historical purchases is uploaded
- Each module has been previewed and tuned in the Control Panel
- The products shown on the website match the output in the Control Panel
- An ItemClick event is sent from every active module
For the full test before launch, see End-to-end test and go-live
FAQ
Q: How long does it take before the modules work?
A: With historical purchases uploaded, modules can personalize right away. With live tracking only, expect about a week, but this varies from business to business. The quality keeps improving as more data is collected.
Q: Do I need a product feed?
A: We recommend it. The feed keeps product names, prices and links up to date, and lets Raptor leave out products that are no longer available.
Q: Can I style the modules myself?
A: Yes. Raptor delivers the recommendations as data, and you decide how they look on your website.
Who can I contact for help? Reach out to your Raptor contact person or our support team.