Introduction
Raptor's Customer Data Platform (CDP) integrates with MailChimp. From the CDP, it is possible to synchronize audiences to MailChimp for advertisement use.
When a person enters/leaves an Audience in Raptor's CDP, the MailChimp activation is automatically updated in real-time.
How it works
1. Setup general information in Raptor
In Raptor you will find a template created to assist the integration setup. To create the MailChimp Activation, go to “Customer Data Platform --> Activation --> Create New Activation --> MailChimp.
Type in Name, Description and select the preferred person identifier - in MailChimp this would be the "Email" - and click Next.
2. MailChimp information
To establish communication between MailChimp and the CDP, you need the following information:
- API key
- Audience Id
NB: Keep this browser page open through the whole setup.
3. Find information in MailChimp
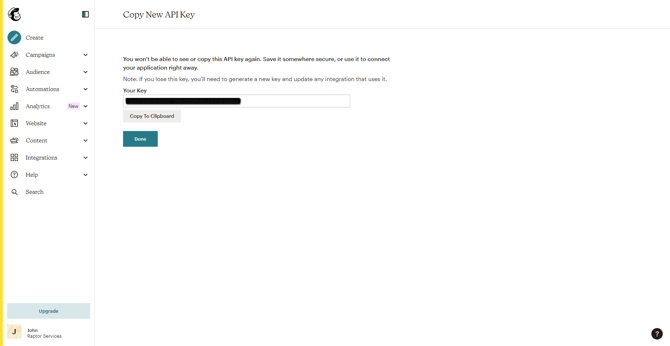
First, you need to find the API key for the Raptor integration.
In your MailChimp account, go to your Account Overview by clicking on the name in the lower left corner of the front page. Then select the Extras dropdown in the top menu, and click on API keys.

Here, you need to create an API Key for Raptor by clicking on Create New Key. It is suggested that you name it Raptor or similar for simplicity's sake. The key will be displayed on screen, and can be easily copied into the appropriate field of the Raptor CDP. Keep in mind that, as is also stated on this screen, there is no way to retrieve or read this key after you click the 'Done' button here. If you lose it, you will have to create a new key instead.
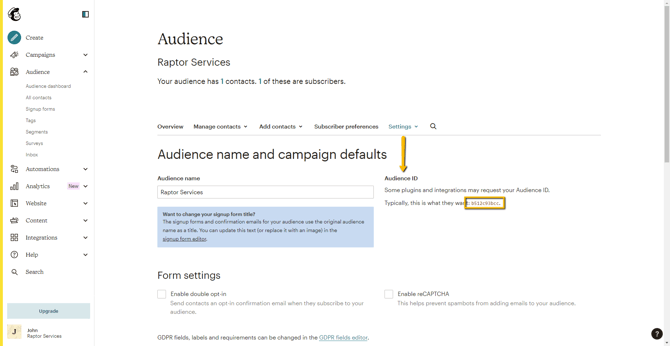
Next you need the MailChimp audience ID, for the places you want to use the CDP audiences as segments.
- Go to “Audience” in the menu on the left side of your screen.
- Choose the audience you want to use for CDP audiences
- Click on the drop down, Manage Audience, in the top right side of the screen
- Open the Settings drop-down
- Click on Audience name and defaults and find the Audience ID at the right side of the screen under “Audience ID”
- Copy the ID, then paste it into the appropriate field of the Raptor CDP
4. Add audiences and calculated attributes
At the bottom of the page, you can attach an audience.- Click Select audiences in order to attach audiences to your MailChimp Account.
- After you have chosen an Audience click Apply and a success message will appear on the screen. (NB: Start with one audience – you can always attach more)
- Now wait 5 minutes for the sync to take place.
5. Using audiences in MailChimp
When you want to use the audiences and calculated attributes you have created in the CDP, you need to attach them to the activation. There are two ways for doing this:
- Either go to the activation and add audiences and calculated attributes in the bottom of the page.
- Or attach the audience or attribute directly in the audiences by click on the three dots in the top right corner and click Attach to activation and choose MailChimp. Now they will synchronize automatically to MailChimp.
When you have some audiences synchronized to MailChimp, you can find them in MailChimp in the audience you chose in the activation.
- Go to Segments in the menu on the left
- Click Create segment and here you can find CDP audiences in the drop down on the left under “Groups”.
- Choose which CDP audience you want to use for the segment.
- After creating the segment, you can find it in “Segments”, in the menu to the left, and you can find the list of persons in the audience.
🔍Note: When an Audience is detached from this Activation, the corresponding interest is deleted in Mailchimp.