![raptor-qntm-logo_horizontal_gradient.png]](https://content.raptorservices.com/hs-fs/hubfs/raptor-qntm-logo_horizontal_gradient.png?height=40&name=raptor-qntm-logo_horizontal_gradient.png)
Behavioral Triggers are automated emails send based on how a customer interacts with your products (see Introduction to Email Triggers). Some triggers send based on on-site behaviour alone, but others, like the Price Drop and Back on Stock triggers, react to a change in your product data itself, for example a price cut or a product coming back into stock. For those triggers to work, Raptor needs to watch your product feed for the relevant field changes. This article shows you how to switch that connection on.
Prerequisites
- A product feed connected to Raptor (see Everything you need to know about Product Feeds)
- Access to Behavioral Triggers in the Raptor Control Panel
Which triggers need a product feed connection?
Raptor watches your product feed for changes in specific fields. When a watched field changes, Raptor generates an internal event, and the individual trigger's own rules decide who gets an email.
Price Drop triggers (Price Drop Basket Trigger, Price Drop Favorites Trigger, Price Drop Product Interest Trigger) Triggered by a change in the OnSalePrice field.
💡 Example: If the price drops by 10% or more, send an email to customers who visited the product at least twice at full price.
Back on Stock triggers Changes from False to True in the InStock field alert the trigger. In the Data Manager, the information you deliver in the InStock field is converted into a True/False boolean. Triggered when the InStock field changes from false to true.
💡 Example: Send an email to customers who visited the product while it was out of stock.
Campaign Trigger (not available yet) Triggered by a change in a CustomField you choose, for example from empty to a promotional message.
💡 Example: If CustomField5 changes from empty to 'Buy 3, pay for 2', send an email to customers who visited the product at least twice.
🔍 Note: Abandoned Basket Trigger, Product Interest Trigger, and Category Interest Trigger react to on-site behaviour only and don't need a product feed connection.
How to enable trigger events on your product feed
- Log in to the Raptor Control Panel
- Go to E-mail Triggers
- Click the "Edit trigger events"-button in the top right corner
- Find the product feed you want to configure and click the pencil icon next to it

- Enable the trigger events you need: Price drop event, for the Price Drop triggers. Stock event, for the Back on Stock Trigger. Campaign event, for the Campaign Trigger, if available - select which CustomField (CustomField1 through CustomField20) holds your campaign value
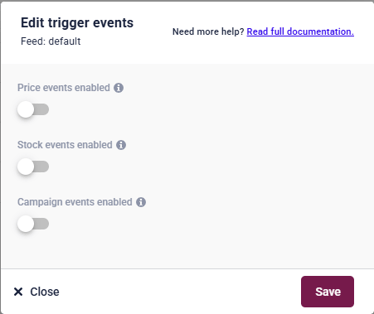
- Click "Save"
🔍 Note: Trigger events are set per product feed, not account-wide. Repeat the steps above for each feed you want connected.
Once you've enabled the trigger events you need, read Understanding Trigger Timing: History Period and Latency Period to see how each trigger's history and latency periods shape who gets an email, or browse the E-mail Trigger Documentation to set up the individual triggers themselves.