An effective search engine is key to creating a great user experience and high conversion in any webshop. Raptor Site Search is a powerful, fast, and modern search solution based on the open-source engine from Typesense.
In the Raptor Control Panel, you create a search index from your product feed and select parameters to show as facets on your website. On top of the search index, you can rank search results using Raptor's renowned recommendation strategies. Once set up, you implement the Typesense search UI on your website, providing you with full creative flexibility and a vast library of tuning parameters.
You can at any time edit a search index to fit the search experience you like to deliver on your website.
This article will show how to set up, configure and test a search index from your product feed.
Set up your search index
Setting up your your search index starts in the Data Manager:
- Log in to Raptor Control Panel
- Select Data Manager in the menu and navigate to "Schemas". Here, you can create a dedicated schema for the product columns you want to ingest to the search index and make searchable. Please only ingest the columns you intend to include in your site search.
- Click "Create new schema" in the top right corner.
- Make sure to select Search as "Destination", and Search Schema under "Select schema". Now, you can add the columns you need for your search index, with product Name and product Id being the only mandatory fields.

🔍 Note: The schema is dynamic, meaning you can at any time add new columns to the schema. When doing this, you must remember to update the search index by pressing the "Save & publish"-button on the index. You must of course also update your dataflow by mapping data to the added columns.
Now, you can establish a dataflow using the newly created search schema to start populating your index with product data. See how to create a dataflow here. If you want to link a Streaming API to your Search Index, you may also want to look at this guide.
Configure your search index
With a dedicated search schema running in your dataflow, you can configure your search index.
- Go to Search Configurator in the menu
- Click Configure search engine (if you don't see this button, go to step 4)
- Click Create Raptor Search. This will create an instance on the Typesense cluster hosted by Raptor. A search server URL and a search API key are generated.
You will need these - along with a collection name that will be generated when creating a search index - when implementing the search UI on your website. - Now, you are ready to create a search index. Click Create new index in the top right corner. You will open the configuration screen
- Give the index a suitable name. The name is needed when you implement the search UI, and cannot contain special characters, spaces nor uppercase letters.
- Select the schema the index should be based upon.
- Now, all the fields you created in the Data Manager are visible and automatically mapped to the search index. They can now be configured.

Id is used in Typesense as a unique key identifying the product. It will not by default be indexed. If you would like your customers to be able to search products by their IDs, the product ID must be mapped separately. Do this by mapping your product IDs in the Data Manager to both the field "Id" and one other field you have created yourself.
Note: The product IDs must be identical to the product IDs used in your tracking. This is important to enable ranking and personalization in your search solution. - Check if the data type is correct - if not, you can change it. The data type dictates which Typesense UI features can be used when displaying the parameter as a facet on your website, e.g. decimals (like price) can be showed as a slider or interval radio buttons for the user to narrow down a search.
- Strings: When the data type is a string, you need to set the locale. If the locale is not correct, features like spell correction, searches with language specific characters, and typo-tolerance are not working correctly. Use "auto" if you do not find the right language in the drop-down. In that case, Typesense will auto-detect the language.
- Decimals: When the data type is a decimal, you need to set the format. It defaults to "da" which indicates the central European format, e.g. 10.000,00, while "en" indicates the English/American format, e.g. 10,000.00
-
When using Embeddings as the index type, you can set the number of dimensions for the vectors used in semantic search.
- Range: 128 (minimum and default) to 1024
- Why it matters: Higher dimensions can improve semantic matching quality depending on the model you use.
For all other index types, this field is fixed and cannot be edited.
- Switch the Facet-button on, if you would like the parameter to appear as a filter on the search page - this will often be the case with parameters like Brand, Category, and Price. If attributes like color, size, reviews, certifications etc. are present in your product feed, these are great to include as facets too.
- Switch the Required-button on to exclude products from being searchable that do not contain information in the parameter.
- Switch the Sortable-button on, if you would like to be able to sort the values of the field. The maximum limit is 500 characters. If a value exceeds the limit an error will be shown when saving the index. Numerical fields are sortable by default.
- Toggle Use Infix to find words by matching characters that appear anywhere within the word, not just at the beginning. For example, searching for “xa” will match “example.” (By default, Typesense uses prefix search, which only matches characters at the start of words.)
-
Toggle Enable Stemming allowing the search engine to match different forms of a word by reducing them to a common root. For example, searching for “run” will also match “running” and “runner.” This improves relevance by helping users find results even when they use word variations.
- Enter the desired characters in Token Separators to define additional symbols or special characters to split text into individual words, beyond the default space and newline characters. For example, adding “-” (hyphen) will split “non-stick” into “non” and “stick”, indexing them as separate words for better search matching.
- Define Symbols to Index or special characters that should be indexed verbatim.
Example: Adding “+” makes “c++” searchable as-is.
🔍 Note: Make sure to include images in the index if you want to display images in your search results. Images should not be included as a facet.
Apply re-ranking and personalization strategies
When setting up a search index, you can apply Raptor's re-ranking and personalization strategies to optimize search results on your site.
In the Ranking section, you can select a search strategy from the drop-down. For a strategy to be available it must be activated and configured in the Search Personalization tab. Read more about one of our most powerful recommendation modules available for Site Search here.

Click Save & publish to finalize your index and make it available for implementation.
Test your search index
When you have configured and published your search index, it will start populating with data from the dataflow and you can test it.
In the Search index list, click Test on the search index you will like to test.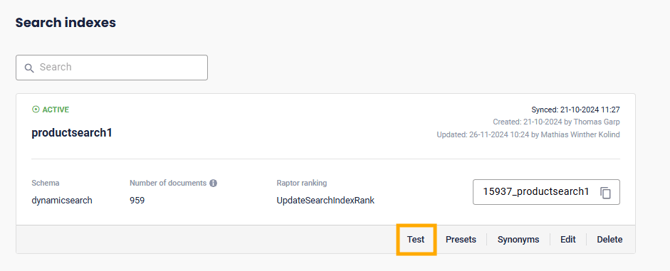
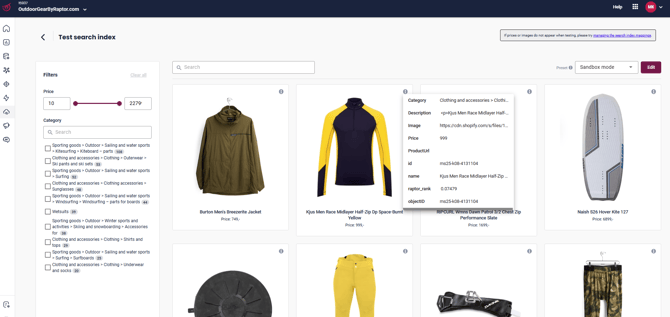
You will now see a test site with a main search field in the top and all the facets you included in your index to the left. The search field in the top will by default search in product names. Test that you find the expected products when searching.
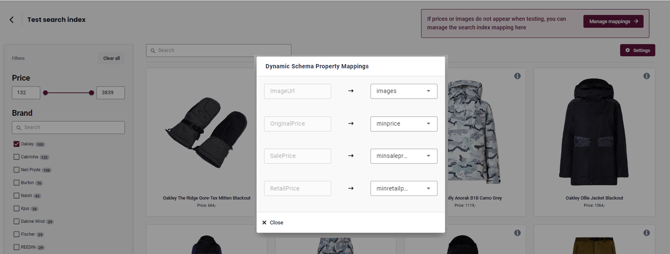
🔍 Note: On the test site you might not see images and prices on the product cards. In that case, you need to point the system toward your image and price columns. Click the "Manage Mappings" button in the top right corner. Select in which columns to look for images and up to three different types of prices
By clicking the "i"-icon on the product cards, you can see the information that is delivered in the search output (including basic information like ID, name, brand, category and technical information like text match score and a rank score)
Presets
When testing your search index we've made several Typesense parameters available for configuring and tuning your search setup. Search presets allow you to store a bunch of these search parameters together, and reference them by a name. You can then use this preset name when you make a search request, instead of passing all the search parameters individually in each search request. You can have multiple presets each applying to different sections of your site.
Here is how to set up, test and publish a preset.
By clicking the Edit-button in the upper right corner, you will open a new window with the parameter settings for the preset called "Sandbox mode". As long as you are working in Sandbox mode, you are testing out parameter settings locally on your computer - once published under a different name, the preset is accessible by others and can be requested from the UI when searching.
Here, you'll see three types of settings:
Queryable fields: configure the parameters the main search field searches in and which relative weights each parameter should have. This will create a text match score used to rank products by. In the screenshot below, the parameter "description" is added, but with half the weight of the product name. This means that search results matching the product name will have twice the weight (and therefore a higher text match score) as results matching the description and thereby take priority. If the weights are of equal value, the order of the parameters will dictate the priority.
🔍 Note: For the weights to take effect, the parameter Text Match Type must be set to max_weight. This can be set under Additional parameters (se further below)
Sorting: Select how your search results should be sorted when they are returned. You can select any sortable field and have results returned ascending or descending. In the screenshot below, search results will be returned sorted on price, lowest to highest. You can select up to three fields - if multiple products have the same price, you might want to control which parameter to sort by as a fallback. You can use this feature to display sort parameters to users in the frontend like this:

Additional parameters: Select settings from a large Typesense library of different parameters. All of the parameters have a best practice default setting, so you are not required to set them. You can use the parameter settings to test out the impact of the settings while testing your search index. In the screenshot below, the parameter Text Match Type is set to max_weight meaning that the weights set under Queryable fields take effect. See more about all parameters and their settings here.

About text match score and ranking: The parameter weights available in the Settings (as described above) is a tool for indicating when a product should have a higher priority than another product by ranking on a text match score.
If a user performs a search for the term "lipstick", and the term is present in both the product name and the description in one product, it will get a higher text match score than a product, where lipstick is only present in the name. And a product where the term only appears in the description will get the lowest text match score of the three.
Raptor ranking strategies will kick in, when multiple products have the same text match score (at tie-break). This way, users will see the most relevant products according to their search terms, but with either personal ranking, popularity ranking, conversion rate ranking, etc. (according to the strategy applied and its settings) as a layer on top.
Save your presets
When you are happy with your test results and your parameter settings, you can save and publish them. This will make your presets available for others with access to the index in the Control Panel, and first of all they are available to use in your search solution.
Click the "Save preset"-button, give your preset a name (no capital letters, special characters nor spaces), and click Save.
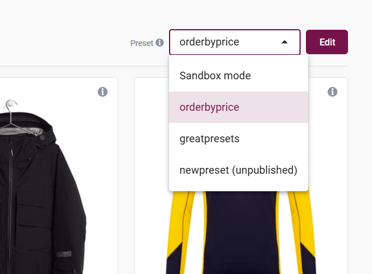
Now, your presets are selectable in the dropdown on the test page, from where you can edit and save again.
🔍 Note: If you change and save presets that are in use in your search solution, the changes will take effect immediately. It also means that you can change settings and fine tune your search solution on the fly without having to redeploy your application.
Call your presets from the search UI
On the overview page, click the "Presets"-button on the index card. Here, you'll find the system preset name you'll need to reference the presets in your search queries. You'll also find a guide on how to call the presets from your search solution

Synonyms
The synonyms feature allows you to create two kinds of synonyms: one-way synonyms and multi-way synonyms.
One-way synonyms: Defining the words iphone and android as one-way synonyms of smart phone will cause searches for smart phone to return results containing iphone or android or both.
With Multi-way synonyms you define search terms that should be considered equivalent to each other. If you define the terms jacket, coat and blazer as synonyms, searching for one of those terms will return all records containing one or more of the three terms.
This way you can create synonyms that are specific to your product catalog and improve the hit rate when your customers search on your website.
1. On an active search index, click the Synonyms button

2. To create a multi-way synonym, enter the terms that are equivalent to each other in the Synonyms field e.g., blazer, coat, jacket. Separate the terms by a comma. Leave the Root field empty.
2a. To create a one-way synonym, enter the root term that you wish to create synonyms for (e.g. shoe) in the root field. Now, enter synonyms in the Synonyms field e.g., sneaker, loafer, pump. Separate the terms by a comma.
🔍 Note: synonyms are - like search phrases in general - not case-sensitive, so you only have to create your synonyms once.
3. When you are happy with your entry, click Add synonym button and it will appear in the list below.
4. You can import synonyms from a CSV file, if you already have a library of synonyms from your existing search solution. Click the Import from CSV button, where you will also see details about the format of the CSV. The format is: ID;Synonyms;Root
5. You can export the list of synonyms by clicking the Export synonyms button, which is useful if you want to replicate the list of synonyms on another index. This will download a CSV to your downloads folder on your computer.
🔍 Note: When downloading your synonyms each will have an ID. By keeping the ID when changing the synonyms in the downloaded CSV file and importing the file again, the existing synonyms will be overwritten by your changes. Leaving the ID field empty, an ID will be generated automatically during import.

You can at anytime edit your synonyms through the list. You can delete synonyms one by one or use the Select checkbox to select all/multiple synonyms to delete. Changes and new synonyms will be carried into the search index automatically every time the index is updated (once a day), but you can test the index immediately after creating or changing synonyms.
More search features and settings will be added to the solution continuously.
Implement a search UI on your website
Once configured and tested, you can implement a search UI based on the guide from Typesense. Find the guide here.
You will need three pieces of information that are found in the Search Configurator in the Raptor Control Panel:
- Search server URL
- Search API key
- Collection name
