Merchandising
E-commerce merchandising is a practice of displaying products to attract your customers’ attention, highlight products, and maximize your sales.
Raptor’s Merchandising adds campaign tools to personalize and manage active sales campaigns. This enables detailed control of which products should take precedence in specific modules, increasing product exposure just where you want it.
How it works
Using Merchandising requires you to have already set up one or more Web, E-mail or Site Search recommendation modules. An active Product Feed is also required, featuring - at a minimum - a Product ID and Image URL for each product. If you have not yet set this up, see Setting up a Product Catalog for Merchandising.
Merchandising utilizes your recommendation modules as advertising space and lets you put specific items right in the customer’s line of sight, combining customer relevance and campaign promotion. Make brand specific campaigns or advertise specific items you want to move from your stock. Sell top spots to suppliers or prioritize high-margin products by boosting them to the top spots.
Merchandising automatically tracks the campaign performance to let you know what resonates with your customers.
Each recommendation module for web and e-mail holds a set of 50 product candidates based on relevance for the specific user. The candidate set is dynamically changed according to the behavior of the user. Only products that are already in the candidate set are boosted through Merchandising. This ensures that even though recommendations are influenced by a Merchandising boost, they are still highly relevant to the user.
Set up
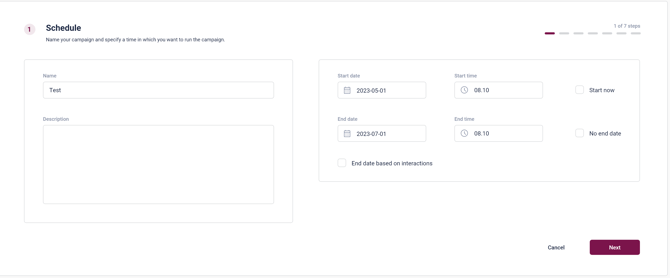
Step 1: Schedule campaign
Name your campaign and specify the campaign time period. Choose a specific start-time - the default being present moment. An end-date can be set, or the No end date checkbox can be marked to leave the campaign running until manually disabled.
Step 2: Attach Audiences (optional)
In this step, you can attach one or more Audiences from the CDP to your campaign in order to targeting those visitors specifically.
All audiences available to your account will be visible and selectable here. However, for an audience to be used effectively in a Merchandising campaign, it must be attached to a Merchandising activation. You can verify this by checking the Activations column in the list, which indicates whether an audience is currently linked to an activation.
💡In multi‑account environments, campaigns automatically resolve audiences from the appropriate CDP account within the account group.

Step 3: Search and select Products
In this step, you will select the products you wish to advertise - the most complex and, arguably, important part of the process. As such, we will go into a bit more detail about the hows, whats and whys.
%20-%20Step%203.2%20B%20%E2%80%93%20112.jpg?width=670&height=355&name=Product%20Search%20%20(Condition%20selection)%20-%20Step%203.2%20B%20%E2%80%93%20112.jpg)
- Firstly, you will be able to select which feed to use from a drop-down menu. In addition to regular feeds, you can also select a Dataflow that has been created with Merchandising as its Destination - providing you with an already curated product-selection.
- Manually search for products is primarily useful in cases where you wish to magnify a small selection of hand-picked goods. You can search by Product ID, Name or Category Name, and optionally set a price-range as well. Multiple items can be searched for simultaneously, using a comma-separated list, and once marked for boosting a product will remain selected even if another search is performed.
- Advanced Product Filtering option lets you create a custom filter, boosting every product it catches - ideal for enhancing large swathes of the catalog. You can select the what to filter by - such as name, price or category - along with a selection of conditions depending on the chosen term. For example, 'BrandName Contains Adidas' or 'Originalprice GreaterThan 700'.
%20-%20Step%203.2%20B%20%E2%80%93%20111.jpg?width=670&height=324&name=Product%20Search%20%20(Condition%20selection)%20-%20Step%203.2%20B%20%E2%80%93%20111.jpg)
Note that the filter-options are derived from the ProductFeed you selected in the drop-down on the main selection-screen. Notably, this includes a number of Custom Fields that are set up on a case-by-case basis. By consulting the Feeds section of the Integrations-menu, you will be able to check which Custom Fields your feed is using, and what they are used for.
- In Advanced Product Filtering, everything that your filter finds is automatically selected, but it's possible to narrow the scope by adding additional conditions. These always function as 'and' parameters, meaning that only products that fulfill both conditions are selected. A classic example of this might be to select all products with a particular BrandName, but then narrowing it to those that have an OriginalPrice above a certain threshold. Multiple items can be searched for simultaneously, using a comma-separated list.
Once the filter has been configured to your satisfaction, simply validate the search, and whatever is found becomes your new campaign.
Step 4: Select modules
Choose the Strategic Modules that you want to boost your products in. These are sorted into the categories of Web, Email, or Search originating from their respective Personalization-sections. You can select as many as you wish, but you must pick at least one.
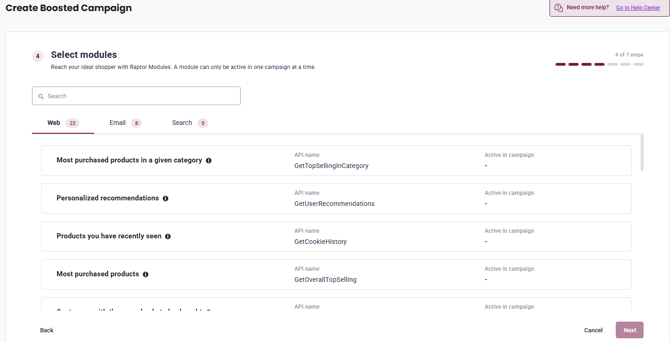
🔍 Note: A module can only be active in one campaign at a time. If it is already in use, select another module or adjust the campaign timing.
Step 5: Choose boosting level
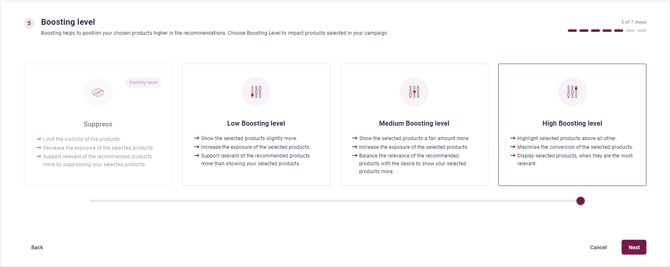
Choose the Boosting level to define how much attention your chosen products will get in the defined modules. A high boosting level will almost almost place the selected products in the top, whereas medium and low levels will leave more room for the personalization logic defined by the algorithms behind the recommendation modules.
The merchandising boosting includes the option to actively Suppress the selected products. By suppressing products they will be ranked lowest when they are present in the set of products that are selected in the specific recommendation call (in practice meaning they will very rarely be displayed to the user). This is useful if you for instance want to keep low-margin products from getting recommended, e.g. in your search results.
🔍Note: Not all recommendation modules support Suppressing of products. If you select a module that does not support suppressing, you will not be able to save the campaign. In general, only newer modules support Suppress.
Step 6: Sister Accounts (optional)
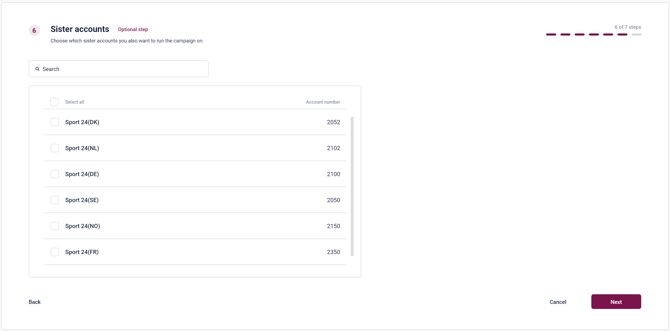
If your account has one or more Sister Accounts, you can - in this step - elect to run your new Campaign on any of those as well. If you don't have any Sister Accounts, or do not wish to run this Campaign anywhere except this one Account, you can skip this step.
👀 Use case: Cloning to sister accounts is currently disabled for manual product selection due to technical limitations. Please use the advanced product filtering option instead.
Step 7: Summary
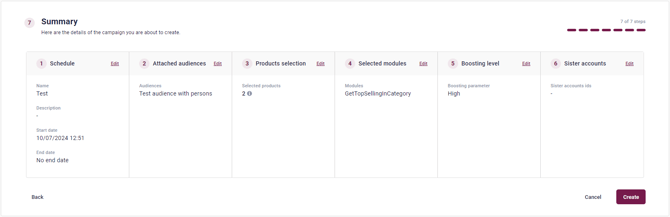
The last step provides you with a complete overview of all your choices during the Boosted Campaign creation-process.
🔍Note: Click the step indicators in the top right corner while setting up or editing a campaign to jump between the different steps.

The Campaign Overview
By clicking the Boosted Campaigns headline in the menu, an overview of your campaigns will appear. Each campaign is represented by a card containing a summary of settings, including campaign period, audiences, modules, products and boost level. The list is sorted into the Active tab, which shows Campaigns that are currently Running or Paused. Campaigns that have run their course or been manually Stopped are found in the Completed tab.
🔍Note: Hover the title of a campaign. This will show you the title and description in full length.
You will also see three metrics that measure the performance of the campaign:
Clicks: Displays the number of clicks on products that are featured in the campaign
Total campaign revenue: Displays the total revenue for the campaign period, stemming from products that are featured in the campaign
Click the "Reporting"-button to see the metrics in details, and read the Merchandising Reporting guide here.