Introduction
Aggregation Mode is one of the Data Manager’s more advanced features, designed to allow the creation of dataflows that group the data of multiple users or events according to selected criteria. The primary use for this is to aggregate or group interactions such as purchases or product views by user. Often, the aim is to aggregate several order lines created by an individual user into one collective order.
But Aggregation Mode can do much more than that. Applying it can be somewhat complex, but this article aims to help explain the uses and applications of this feature.
Activating Aggregation Mode
Aggregation Mode comes into play during the fourth and most extensive step of the Dataflow Creation process – the Transform & Map stage. When you add a schema, a checkbox can be selected that activates this schema in Aggregation Mode. Alternately, once a schema has been established, Aggregation Mode can be activated or cancelled using the drop-down menu in the upper-right corner.
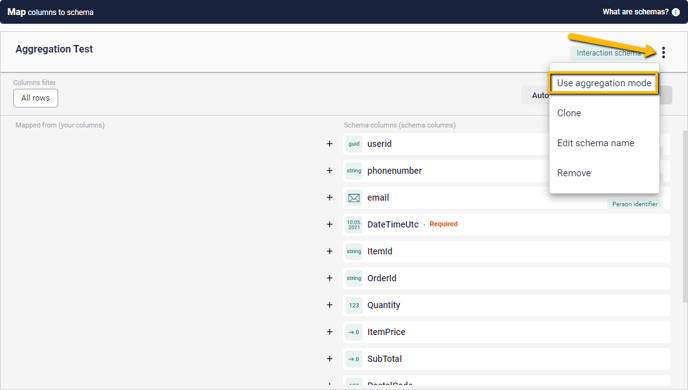
Note, however, that toggling Aggregation Mode on or off in this way will clear any mappings that have been done so far. Hence, it is best to decide whether you need Aggregation for this particular Dataflow well ahead of time.
What changes in Aggregation Mode?
Once Aggregation Mode has been engaged, several things will change. Most notable is the new field next to the Columns Filter in the upper-left corner of the Schema-window – the Grouped By field. This opens into a drop-down showing all current Columns, allowing you to check one or more that the data will be grouped by.
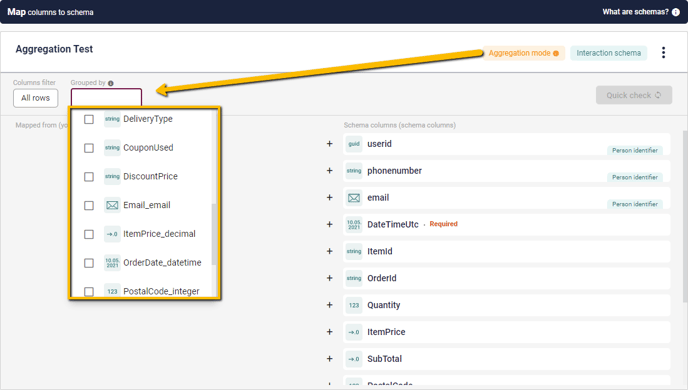
This includes any Custom Columns you have already created. Make sure you are selecting the right version of the Column. Custom Columns will be at the bottom of the list.
The other notable shift is that most of the Schema Columns now have two options available when you mouse over the + sign beside them – Map and Aggregation Map. The exception is any Schema Columns designated as Person Identifiers, which do not offer the Aggregation Map option.
Aggregation Mapping
Firstly, a word about the ‘regular’ Map-option. For Aggregated Schema, this can only be used for Person Identifier Columns, OR any other column that has been selected in the Grouped by menu. Using the regular Map-option in other cases will simply show no available options.
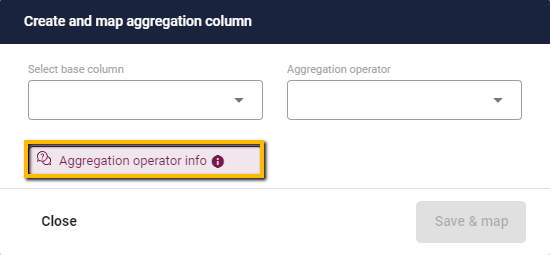
As for the Aggregation Map itself, it offers two choices – firstly, as with a regular Mapping, you select the base column, be it a converted Custom Column or part of the original download. Secondly, however, you must select the Aggregation Method. This is a crucial and rather complex step in the process.

The Aggregation Methods depend heavily on which type of Column you are dealing with. Different types of data offer different possibilities for data collation. For instance, the decimal data-type – often used for prices – can be aggregated by Average, Maximum, Minimum or Sum. Meanwhile, the DateTime data-type can be aggregated by Earliest or Latest. All of these serve to turn multiple values into a single value for the purpose of the Aggregation, and work exactly as you’d expect them to. When doing Aggregation Mapping, you can easily check which options the various data-formats offer by mousing over the Aggregation operator info button.
Of particular note is the String data-type which, by its very nature, cannot be practically combined since it often contains text-strings. For this, the only option is Distinct List aggregation, which simply shoves all the relevant strings together into a single block. There are also several data-types that do not allow for Aggregation Mapping at all, since they do not lend themselves to such things, like the Boolean or E-Mail. If these are used, it should be as a Person Identifier or part of the Group By selection. In general, an Aggregation Mapping will be rather more limited in scope than for a regular Dataflow, focusing on a small number of important datapoints – the Schema used should reflect this, using only the most necessary columns.
For a complete list of the available Aggregation Operators and the situations under which they can be used, see the Aggregation Operators Guide.
Limitations of Aggregation
When using Aggregation, the system can only operate within the constraints of the 'clumps' of data you provide it. Hence, if you load a file containing a year of customer interactions into the system, all aggregation is limited to this data... but if you use it on a source of streaming data, such as website metrics, you'll be operating with far smaller 'clumps. If your data updates on an hourly basis, you're aggregating within that hour of data - if it updates every night at midnight, you're drawing only on that day of data.
Useful Applications for Aggregation Mode
So, considering all these options, what can you really use it for? As with many of the tools offered by Raptor, the possibilities are myriad – but here are a few specifics that may be applicable to you.
Perhaps the most common use for Aggregation is the collation of individual purchases or other interactions into a complete order. For instance, if you're drawing on website metrics set to update hourly, all interactions by the same customer within this span can be considered effectively, if not technically, to be part of the same order. So, what if you want to know who has spent a total of at least X in your web-shop, or bought a minimum of Y items in total during this time-window? For that, you will need Aggregation Mode.
- Drawing on data from the website, select a relevant Person Identifier – be it User ID, E-Mail or otherwise – from the downloaded columns and convert it into the appropriate format, before selecting it in the ‘Grouped by’ field.
- Map the column in question to the appropriate line, as you would with any other Dataflow.
- Convert some suitable values – such as Quantity and SubTotal – into the correct formats as well. In this case, Integer and Decimal, respectively.
- Use Aggregation Map to connect them with the right lines, selecting the Sum aggregation in both cases.
This will provide you with a basic Aggregation that gathers all Purchase Events for a given customer, within the constraints of the dataset, into a single unit - allowing you to draw conclusions based on their overall behavior rather than individual interactions.
Also keep in mind that a DateTime column will be neeed for most CDP treatments, and make sure to add one. In situations such at this, the relevant timestamps are likely to be quite close together, So it won't matter much whether you pick Earliest or Latest for the Aggregation Operator.
Multiple Source Aggregation
As previously mentioned, it is possible to group an aggregation by more than one value simultaneously. A common example where this might be needed is if you want to group purchases into orders, but don't have a Session ID or similar to group them by, and the data is in too large clumps to rely on Person Identifier alone. In such a situation, your best bet is to group by two combined factors - a Person Identifier and a Timestamp. After all, interactions made by the same person within the same short span of time are likely to be part of the same order. This works best when using a relatively low-accuracy Timestamp - down to the minute or, for larger datasets, the date alone - since depending on the system, the individual parts of an order may occur across more than one second.
- Drawing on data from the website, select a relevant Person Identifier – be it User ID, E-Mail or otherwise – from the downloaded columns and convert it into the appropriate format. Here, we are using E-Mail.
- Select a datapoint that can identify the order. Here we till be using Date-Time, but there may be other options depending on what data you have available. In either case, convert the column into format required by your Schema.
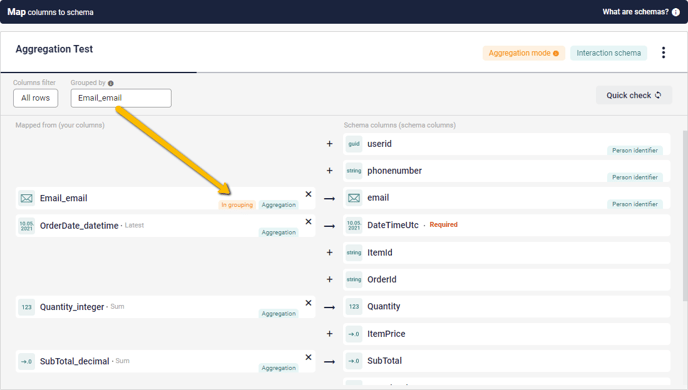
- Click on the Grouped by field to open the drop-down list. Select the Person Identifier and the Date-Time or equivalent.
- Now, map both of your prepared columns to the schema using the Map button. Both will be marked as In grouping rather than Aggregation.
- Even if you aren’t using the DateTime column to identify orders, you will likely still need to map this as well, as mentioned in the previous example – it is Required by default, and necessary for most CDP interactions. If it isn’t part of the Grouping, thus, use Aggregation Mapping to add it. Once again, it won’t matter whether you use Earliest or Latest for the aggregation operator...
- Map the rest of your desired columns. This could be Subtotal, as in the example above, or something like ProductID or ProductName, using the String column-type and Discreet List aggregation, to get an overview of what was ordered together.

⚠️Note: due to the prevalence of this sort of scenario - and for several other good reasons - any Person Identifier you map while in Aggregation Mode is automatically added to the Grouping. In the case of redundant Person Identifiers, you can manually remove one or more from the Grouping, of course, but even then it is generally recommended that you leave them in.
This example uses E-Mail to identify customers and a date-only Timestamp to identify the order, while providing String-blocks for both ProductID and ProductName and the Sum of the Subtotal. This would allow the CDP to work out lists of, for example, everyone whose orders within the given dataset always included a particular item, or spent money above a certain threshold.
There are just two examples of how Aggregation Mode can be put to good use, however. Many new possibilities for turning raw customer data into useful metrics are enabled by its careful application – consider how it can best enhance your advertisement strategy, and use it to make your data work smarter, not harder.