The Data Manager is a powerful self-service tool for ingesting, mapping, and cleansing dataflows going into the Customer Data Platform or the Recommendation Engine. You find the Data Manager in the Raptor Control Panel under Tools.
The Data Manager provides a step-by-step widget to setting up and scheduling the import of dataflows from a variety of sources into the CDP or the Recommendation Engine. Think of the Data Manager as a window into the engine that ties your data to the Raptor system and structures it so it is ready to be activated for instance in the Audience Builder. We have taken a complex procedure and made it manageable for people without coding skills.
That being said, you need to know your way around first of all your data and secondly, you should have a good understanding of how and where data is utilized in the end. Luckily, your dataflow setup is validated throughout the setup guide, and you can monitor errors with Raptors Operational Insights service once the flows are up and running.
We are adding features and improving the Data Manager at a rapid pace. Please don’t hold back input or ideas, if you experience things that can be improved or you are missing functionality or features.
This guide will get you started and explain the individual steps when setting up a dataflow. Also, see separate articles on Schemas & Sources and The Dataflow Overview for further introduction to Data Manager functionality.
Table of Contents
1. Creating a Dataflow
Selecting the ‘Create new dataflow’ button at the top of the page or the center of the Welcome-screen, or selecting an existing or draft-state dataflow, will take you into the Dataflow Creator. This consists of five stages which must be navigated in order. Once a stage has been completed, you may freely navigate to it when needed. Each step provides a checklist at the top, showing which mandatory fields have yet to be filled, as well as the option to save your work-in-progress as a draft.
2. General information
In this stage, you will need to fill in the most basic information about your new Dataflow.
The Name (mandatory) and Description (optional) are purely for your own use. Source and Destination are key to the functionality of the Dataflow. The selected Source generally denotes where you are pulling the data from, be it website tracking, physical stores (POS), email marketing systems etc., and play a key role in identifying the finished dataflow in the Audience Builder and other Raptor applications. Destination is the Raptor component that will put the processed data to use – such as the Customer Data Platform for persondata, website tracking data or POS data, or Merchandising for product feeds. This will generally be the same as the Destination selected for the Schema you will be using later in the process-
3. Download
In this stage, you will select how and from where the data for the dataflow is downloaded by specifying a download protocol and providing information needed to access the data files.

Two sets of Download Protocols are available - Standard Connectors, which are generic and universal, and Third Party Connectors unique to various other service-providers. You can switch between the two lists using the tabs at the top of the list.
⚠️NOTE: Whatever source and download-method you use, Data Manager is fully case sensitive. This is important for many datatypes, but also means that shifting the casing of columns, names and other aspects of the source data, might impact and even break existing Dataflows. Please keep this in mind when considering where to draw your data from.
Standard Connectors:
HTTP
Download files from an online placement over HTTP(S) by simply providing the URL of the file. When selecting it, however, it will unfold to also offer the options HTTP w/ Header and HTTP OAuth2 Authorization. Using the former, you will be prompted to add a bit more information:
- URL
- Header Name
- Header Value
Using the secure Oauth2 Authorization version, meanwhile, will instead require some security information:
- URL - same as before
- Access Token URL - the location of the Token Endpoint
- Client ID
- Client Secret
FTP
Download files from FTP by providing following information:
- FTP host
- File path where the file can be found
- Username of the FTP
- Password of the FPT
Manual Upload
A rather unique option - this allows you to simply select a file from your hard-drive, even using drag-and-drop. This is intended primarily for test-runs using excerpts from larger datasets, as well as one-time runs for small amounts of data. There is a size-limit of 30 MB.
SFTP
Download files from SFTP by providing following information:
- Host
- Port
- File path where the file can be found
- Username of the FTP
- Password of the FPT
💡 Using placeholder values:
When setting the file path property, you can use special placeholders to make the file name pattern dynamic.
It allows you to make to automate the import process even when the name of the file changes over time.
There are two available placeholders that you can use in the file name:
-
{Today}is replaced by the current date in the specified format.
You can also modify the date by specifying an offset, like in the examples below:
-
-
{Today:yyyy-MM-dd}becomes2025-01-02 -
{Today-1:ddMMyyyy}becomes01012025
-
See custom date formats to learn more about the available fomats.
*wildcard
Available for FTP and SFTP connectors.
Represents one or more unknown characters in the file name. A pattern like export*.csv will match all files with names beginning with "export" and having the CSV extension.
You can specify the file name using multiple placeholders at the same time, as in the following example:
Export VIP Club Transactions/Vip-Transactions-{Today:yyyy-MM-dd}*.csv
This example would match file names like:
- Export VIP Club Transactions/Vip-Transactions-2025-01-02-Export.csv
- Export VIP Club Transactions/Vip-Transactions-2025-01-02_v1.csv
- Export VIP Club Transactions/Vip-Transactions-2025-01-02-12-34-56.csv
If multiple files match the pattern, the latest modified file is selected.
StreamFile
The StreamFile option will bind the dataflow to the Raptor Streaming API (click here to go to documentation and endpoint), and rather than requiring an input, it will auto-generate a StreamID when selected. This ID is then input into the Raptor Streaming API header, allowing you to establish a datastream from the Streaming API into the Data Manager.
Website tracking
You can connect your website tracking performed by the Raptor tracking script to the Data Manager and stream data into the CDP by providing following information:
- Account ID of your Raptor Account (four or five digits found in your Raptor Account)
- Start year (YYYY), start month (MM) and start day (DD), which indicates the point in time from when you like to ingest data from your website tracking
Third Party Connectors:
Shopify
You can download customer data from your Shopify shop using the following information:
- API Key - found or created in your Shopify account.
- In the Shopify Admin Overview, open the Settings-menu.
- Select 'Apps and sales channels', and click on 'Develop apps' in the resulting view.
- You will see an overview of your custom apps. If you already have a suitable one, with at least read-access to our Shopify Product Catalog, you can use that - assuming that you have its Admin API Key saved somewhere, seeing as Shopify does not allow you to read or copy that key again after the app has been created.
- If you do not have one available, you will need to create one by clicking on the 'Create an app' button, and going through the process - making sure to copy the Admin API Key at the end. For more information on Shopify's App Creation process, see their own documentation HERE.
- ShopURL - this is simply the URL of your Shop, written in full to include HTTPS://
ActiveCampaign
You can download data from your ActiveCampaign database using the following information:
- API Key - found in your ActiveCampaign client, under Settings > Developer
- AccountName - can be found in a few places, but the easiest way is to go to Settings > Account. It will be shown there in the format accountnamehere.activehosted.com
- Custom Fields to Search For is where you select what data you wish to retrieve from the ActiveCampaign database. Basic CustomerID lines including Firstname, Lastname, Phone and Email are included by default, but all other desired fields must be entered here in a comma-sepparated list.
- A full list of available fields can be found in your ActiveCampaign account under Contacts > Fields.
- A full list of available fields can be found in your ActiveCampaign account under Contacts > Fields.
Agilic
You can download data from your Agilic account using the following information:
- Client ID - This is essentially an API Key. To find (or create) one, log into your Agilic account and go to Settings -> Integrations -> API. There, select or create a suitable Credential. The Developer Key of the Credential is what we refer to as the Client ID.
- Client Secret - Found in the same place as Client ID, this one tagged simply as 'Secret'
- Fields to Import - These are the datafields you wish to import. You can view a full list in the 'Data' section of your Agilic account. Simply write out the relevant names in comma-separated form with no spaces.
HeyLoyalty
Download a client-list directly from HeyLoyalty.
- API Key & API Secret
- Go to your HeyLoyalty account
- Click the Profile-picture in the upper right corner, and select 'Kontooplysninger' (account information)
- Scroll to the bottom of the resulting info-screen to find both API Key and API Secret
- HeyLoyalty List ID
- Navigate to the 'Lister' section of your HeyLoyalty account
- Select the list you wish to import into Data Manager
- Copy the List ID from your browser's address-bar at this point. It is the purely numerical part of the address.

HubSpot
From HubSpot you can download persons with attached properties from your HubSpot account. You need to be "super admin" of your HubSpot account to be able to fetch the required information. Following information is required:
- API Key
- Go to your HubSpot account
- Click the settings icon in top right corner
- In the left sidebar menu, navigate to 'Development' --> 'Keys' --> 'Developer API Key'
- If a key has never been generated for your account, click Generate API key
- If you've already generated an API key, click Show to display your key

- Copy the key and paste it into the API Key field in the Data Manager.
- Properties
- Click the settings icon in top right corner in your HubSpot account
- In the left sidebar menu, navigate to Data Management > Properties
- Find the properties you would like to include and click their name
- In the right hand side panel press the </> icon next to the property name
- Now copy the internal name and paste it into the property field in the Data Manager
- Repeat for each property, and separate the properties by commas
- Note: The Data Manager will automatically fetch Email, First name and Last name of your HubSpot contacts. If you only need these three properties of you contacts, you can leave the property field in the Data Manager blank
Salesforce
You can connect a dataflow directly to your Salesforce account using this option.
- ClientID, ClientSecret, AccountID and Data Extension are all found in your Salesforce account. Being a highly flexible platform, however, the exact locations will depend on how your account is set up.
- Subdomain is the designation for the personal subdomain that Salesforce provides you, and can be found in its address. The format of the address will likely be something like this: https://yoursubdomainhere.auth.marketingcloudapis.com/
- Note that processing Salesforce data is a relatively resource-intensive endeavour, which can create an effective upper limit for the amount of data that the system can 'digest' within a given timeframe. Half a million lines per day is a rough estimate of the system's upper limit, so if higher numbers than that are needed, an alternate download-source may be advisible.
Regardless of the options chosen, the Data Manager will validate the supplied information before allowing you to proceed. Assuming all data has been entered correctly, the download will proceed, which may take some time depending on the amount of data. When complete, you will be given the option to download and view a local copy of the data – which may prove necessary for troubleshooting purposes. The Data Manager also identifies the format of the supplied file, with the options currently supported being: XML, CSV, JSON and Raw.
⚠️ Warning: About file-sizes, in most cases, there are no file-size limits for Data Manager - larger files may simply take longer to process. However, there are three exceptions.
- Firstly, if Aggregation Mode is meant to be used during the later stages of the procedure, it is advisable to stay beneath 300 MB, since there are memory-limits involved in this process.
- Secondly, XML-format files are likewise limited to 300 MB due to the processing-needs of this data. In both cases, the actual limit can be slightly lower, depending on the exact contents of the file - more complex data will eat up memory at an increased rate. Note that this applies regardless of what download-method is used.
- Thirdly, the Manual Upload option, being meant primarily for quick-and-dirty tests and small-batch runs, is limited to just 30 MB. For anything larger than that, other options should be considered.
4. File Mapping
This stage will generally be completed automatically – once the system detects the format of the supplied file, it will fill in the all the necessary information itself and show the parsed columns on the right. Here, the available columns can be seen, examples of their datapoints can be viewed and names can be changed.

At this time, four file-formats are recognized by the system: CSV, JSON, RAW and XML. The top of the screen will show which format the file has been recognized as, as well as allowing you to manually select the format in the rare cases where file-corruption, outdated formatting or similar issues might prevent the system from initially recognizing it.
This format makes a difference in a few subtle ways, such as the way the auto-parser handles them. For XML and JSON files, the parser scans the first 20 rows, and creates the column-list based on this - meaning, if there's a column that has values at row 21+ but stands empty for the first 20, it will be left out. 0 is still a value, though, so this should not be an issue so long as the data output is properly set up.
🔍Note: JSON-files have a particular advantage, enabling the use of Streaming API - and you can add even more flexibility to this feature if you check the Ignore missing columns? box. This allows for Partial Updates, as described in Step 4.a - enabling you to update individual cells in the dataflow without sending complete information. For example, changing in-stock status for a product would then involve sending just the product-number and in-stock boolean. Note that, to take advantage of this possibility, you will need to use the Append option when setting up your Schema later in the process, and that any column marked as Mandatory or Required will still be... well, exactly that.
On the other hand, if you do not intend to use streaming API or Partial Updates, you can safely leave this box unchecked - blank spaces in updates will then be treated as errors, potentially helping to identify issues.
For CSV-files, the document Header is used to form the column-list - or, if there is no header, the first line is used. In rare cases, the system may fail to identify the presence, or absence, of a Header - which can lead to column-titles being read as garbled data. In this case, the 'Does your file have headers?' checkbox can be manually toggled to correct the issue.
The ‘Mandatory’ checkbox can be used to disallow empty fields in a specific column – ensuring that an error will be reported if any empty values appear there in future runs. If the current file contains empty values for a given column this option cannot be set.
If the file is in a nonstandard format or the system otherwise has issues reading it, you will need to manually edit the parsing-options or select the appropriate format yourself. After making any necessary alterations, select the ‘Parse File’ button to try again. If successful, the columns should appear on the right as usual. Should problems persist at this stage, make sure you have pointed at the right file in the previous stage.
🔍 Note: Missing special symbols? In most situations, the system will default to the widely-used UTF-8 encoding-system, which covers just about every possible symbol. If your files use a different encoding, you may find some lettes - such as letters or accents unique to your language - being replaced with question-marks or random ASCII-symbols. This can generally be addressed by manually changing the Encoding to '1252' - another popular option, which covers all but the most rarely-used and archaic symbols.
4.a. Partial Updates/Patching
Partial Updates, also known as Patching, are always an option for Dataflows, but the file-type is undeniably relevant. If you are using a CSV, XML, or RAW file, setting up Patching generally involves establishing multiple Dataflows. However, JSON files have the unique ability to establish Partial Updates within a single dataflow - so long as you check the Ignore missing columns? box during this step.
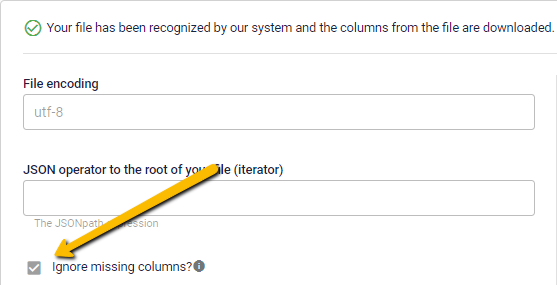
🔍If the checkbox "Ignore missing columns?" is selected, no action will be taken on JSON fields that are omitted from the update
In simplest terms, this setting ensures the system will tolerate outright missing columns in updates. It doesn't apply to any columns marked as Mandatory, as mentioned above, nor any that are considered Required by your selected Schema. Finally, if you use a column as a Filter during the Transform & Map stage, it will need to be present on every update. Outside of these specifics, the 'Ignore missing columns' toggle will allow for partial data to be inserted without prompting errors, by simply using the Append-option during the Transform & Map step.
As long as these factors are considered, and you're using a JSON streaming-file datasource, a number of clever options open up. Notably, you can use one schema - set to Overwrite - to regularly update a product-catalog, while a second schema, set to Append, provides running changes to SalePrice, InStock, or other factors that may require short-term updates.
Mind, it's not as if using Partial Updates across multiple Dataflows - be it with JSON files or otherwise - doesn't have some useful applications. To learn more about this, including specific ideas for how to apply the feature, see the Guide to Multi-Dataflow Patching.
5. Transform & Map
In this stage, you transform data and map it to a schema. On the left are the columns you derived from the supplied datafile in the previous step. On the right, you can select one or more schemas which the values of your original data can then be mapped onto. It is also possible to create a new schema to make it tailor-fit for your data. To learn how to make a new schema, see the Schemas & Sources guide. As a rule of thumb, you will want to use a Schema made for the same Destination that you selected in the first step.

More commonly, you will simply select one of the default or previously-customized schemas available. A specific name can be set for this particular application of the given schema. Once selected, the schema will be displayed on the right, showing the columns it contains and the format they require. Essentially, this provides an easily-accessible blueprint for a dataflow that can be readily understood and employed by Raptor Service’s systems.
You will be able to create a sepparate Filter for each Schema you add to the Dataflow - this can be selected with the 'Columns filter' in the upper-left corner of the Schema. Only columns that meet the criteria selected here will be used in the final calculation. For more information on uses for this feature and the options presented, see the Static & Relational Column Filters article.

Each line of the schema can be mapped onto a column from the data-source on the left. Note however that all columns are, initially, formatted as simple strings. In order to match up with lines that require a particular format – such as conversion-ready currency-values, e-mail lists, decimals and integers that can be plugged into equations or alike – columns must first be Transformed into the appropriate format.
A Mapping Assistant option is also available, which will search the file for matching names and formats for each line – as well as suggesting matches in fuzzier cases. Any of the suggestions can be eliminated from the lineup if desired, and the rest saved to the Schema - giving you a quick and easy way to get some of the basic mapping out of the way.

🔍 Note: When selecting a Schema, you can elect to activate Aggregation Mode for it via a simple checkbox, enabling some more complex mapping-options meant for collating information according to various shared details. For more information about this feature, see the Aggregation Mode article.
5.a. Overwrite, Append, Delete?
When selecting a Schema, you will be required to select whether to Write or Delete, and in the former case, the Write Mode that will be applied to it - Overwrite or Append.

Append is the default - with each run of the Dataflow, new data rows update existing data rows or are added to the dataset already in the CDP, but any other existing rows are left untouched. This effectively means that 'legacy data' is left untouched - if a product is removed from a catalog, or a customer from a mailing-list, the entry will remain in the dataset, unchanged and untouched by repeated runs of the Dataflow. This can be convenient in some cases, allowing the CDP to take such old data into its calculations, and create continuity in the data if the product or person is later added again. In the same way, it is possible to update existing persons or products in the CDP by updating fields in the rows but keeping the unique identifier (often email and product ID) the same.
When selecting Overwrite the original dataset is completely removed and replaced with the new one each time the Dataflow runs. This prevents outdated data from accumulating, and is thus the optimal solution for any dataset that is likely to undergo frequent changes - if lines are added and removed with each run, 'leftovers' can accumulate quickly and slow down calculations. Without the Overwrite feature, this would require an onerous and labor-intensive manual cleanup.
🔍 Note: It is common to regularly overwrite your whole database of profiles so data in the CDP matches the data in your CRM system. This keeps metadata like addresses and names up to date. Overwriting the data in a persondata schema will not delete profiles that no longer appear in your source data - it will only remove the metadata. All person identifiers remain in the CDP, as do the interaction history and CLV calculations. This means that people will still be in audiences and you are still able to look them up in Single Customer View.
If you store marketing permissions in your persondata in the CDP, you can filter out people who have not granted permission to receive marketing material on audience level.
If you want to delete a profile entirely, use the right-to-be-forgotten feature
Append can also be used to enable Patching - that is, pushing partial updates to an existing dataset. This is useful if you need to combine different data sources into the same schema or update specific fields of an existing dataset continuously. For more on this, see the This Guide.
Meanwhile, Delete represents a special case - if you select this, whatever Schema you've selected will be cut down to a single mappable line - the mandatory ID. Mapping this, along with applying a Column Filter - as detailed in the relevant guide - will create a Dataflow that deletes any lines that meet the filter's criteria from the relevant Schema. The Patching-guide linked above includes an example of this as well - it has a number of useful applications!
Write Mode
The table below outlines how different write modes and patching behaviors affect data updates in the Data Manager. It helps clarify what happens when fields are empty, null, or missing.
| Write Mode | Empty Field | Null / Missing Column | Patching |
| Append | Replaces with nothing | Ignores the field / does nothing | Only works with JSON. |
| Overwrite | Replaces with nothing | Keeps the original value if null | - |
| Delete | - | - | - |
-
Append Mode:
Updates only the fields provided. Missing fields are left untouched. Ideal for partial updates where you want to preserve existing data. -
Overwrite Mode:
Replaces the entire object with the new one. Any fields not included in the update are removed. Use with caution to avoid unintentional data loss. -
Empty Field (
""):
Treated as a valid update. The field is set to an empty string. -
Null Value (
null):
Explicitly sets the field to null. This is different from omitting the field entirely.
(In patching only: If a JSON field is missing or explicitly set tonull, it will have the same effect as retaining the existing data.) -
Omitted Field:
In append mode, it’s ignored. In overwrite mode, it results in deletion of the field.
| Input Example | Change/update Made | Result (Append) | Result (Overwrite) | Explanation |
| (nothing) | {ID:"hello", Field:"test"} | {ID:"hello", Field:"test"} | {ID:"hello", Field:"test"} | Writes the value |
| {ID:"hello", Field:"test"} | {ID:"hello", Field:""} | {ID:"hello", Field:""} | {ID:"hello", Field:""} | Field is overwritten with empty string |
| {ID:"hello", Field:"test"} | {ID:"hello"} | {ID:"hello", Field:"test"} | {ID:"hello", Field:""} | If property is missing, b remains unchanged |
| {ID:"hello", Field:"test"} | {ID:"hello", Field:null} | {ID:"hello", Field:"test"} | {ID:"hello", Field:"null"} | If property is null, b remains unchanged |
For more details on schema types and default write mode settings read this.
5.b. Transform, Convert, Combine - Custom Columns
Transform, Convert and Combine is a set of flexible features that can be used to reformat a column, combine multiple columns into a single combined expression, replace certain expressions, or all of the above at the same time. Whatever shape the final data needs to be in, these features will get it there. The +Combine Columns option is found at the top of the Column list, while the other two options - Convert and Transform & Convert - are found by highlighting a Column.
These options can be seen as complimentary 'tiers' of complexity. If you Combine, you will also be given the chance to Transform the individual columns beforehand, and Convert the final result. The Convert-option is just the simplest, eschewing all the other steps.
Regardless of the method used, a default name will be generated once you’ve made your selection - but it is recommended that you change this to a more appropriate name if you intend to use the auto-map option.
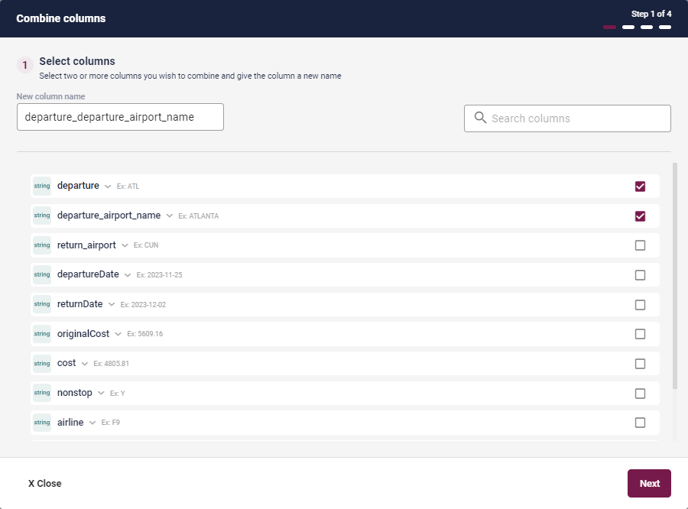
The first step, relevant only to Combine Columns, is the column selection. Here, you can check as many columns as desired, or use the search-bar to find a specific one.
The next step is Transform, unless you skipped this by just selecting the Convert-option. In this screen, a number of different methods can be used to transform the column’s values, ranging from basic formatting or search-and-replace to integrated Regex-commands.
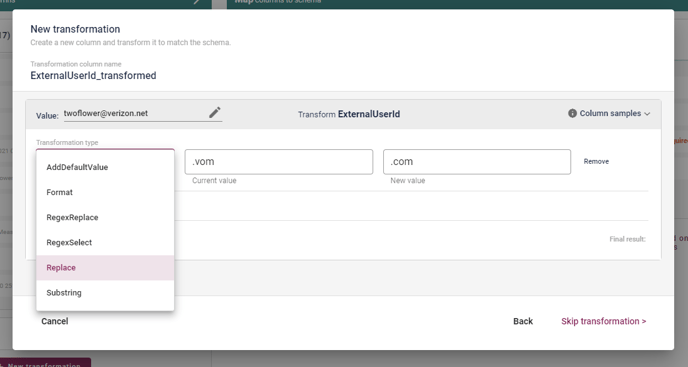
A drop-down in the upper right corner lets you view a selection of samples from the relevant column, helping to give you an idea of what needs doing. If Combine Columns was selected, each column can be individually transformed.
🔍 Note: When converting a column into the 'Email' format, the option to clear out invalid emails will be presented to you. This can prevent mistyped emails from forcing the removal of an entire line, so long as some other, valid Person ID is present. However, it may be advisible to use the Transform-feature for this, utilizing the 'Replace' transformation to fix some of the more common errors - for example, replacing '.vom' and '.con' with '.com' might salvage several emails that would otherwise have been removed altogether.
After selecting the desired transformation(s), hitting the ‘Transform’ button will provide you with a provisionary output, showing the current state of the dataset. The value used for this conversion is drawn from the chosen column and shown at the top, where you can also choose to edit or replace it if you want to watch how the transformations you are applying affect some specific value. Note that once you move past this step, the example-value can no longer be changed.
Applying a transformation is not mandatory – if you got here via Combine Columns and the data is already in an appropriate shape, you can simply select ‘Skip transformation’ to move on to the Converter.
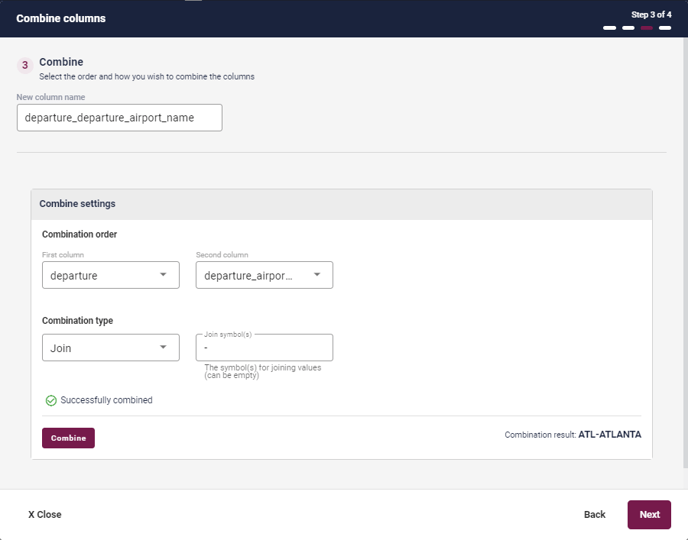
The next step, again exclusive to Combine Columns, is to select what order they are joined in as well as the methodology by which they are combined. Each option requires one or more inputs, each carefully described for ease of use – be sure to consider which will best serve the purpose of the combination. Hitting the Combine button will show you an example result of your chosen settings.
The final step, regardless of chosen route, is the Converter. Here, you select the type of column you want to output in order to match the requirements of the schema. Depending on your choice, various specifics will need to be filled in. While this step cannot be skipped, the ‘String’ option will effectively maintain the same typing that the column started out with, for cases where you simply needed to transform or combine a column. When the appropriate selection has been made and specifics input, hit ‘Convert’ to finalize it. An example will be shown of the final value. At this point, the results can be saved as a custom column with the designated button.

The results of your transformations will appear at the bottom of the column-list, under the header of ‘Costum Columns’. It is now ready to be mapped to a schema-line of the appropriate format. You can also edit any Custom Column, by simply clicking on it - allowing you to quickly navigate through an existing Costum Column, to fix errors or try alternate approaches.
🔍 Note: For a more detailed explanation of how to use all the options available in terms of Transforming, Combining and Converting columns, please see Convert & Transform: A Detailed Breakdown.
5.c. Map Columns to Schema
To map a column to your schema, click the blue '+' symbol to the left of the schema line (the + will be transformed to the word "MAP" when hovering over it).

This will open a box, where all columns with the same data type as the selected schema line are searched out. Select the right column (in this case, we only have one column with the type 'email'). Select the desired row and press 'Save'.
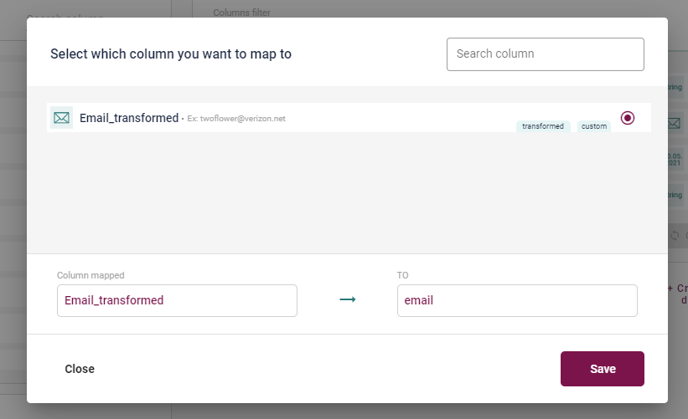
The result of the mapping can be observed in the box to the right.
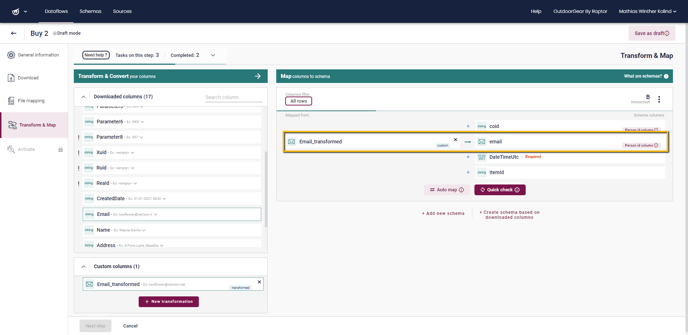
In order to finish the mapping, all lines marked as ‘Required’ in the selected schema must be mapped to a column – all the rest are technically optional, but of course it’s generally better to line up as much information as possible. In the 'Downloaded columns' section, those columns that have been matched to the schema will be highlighted with a solid frame, making it easier to spot which remain unmapped. A large number of unmapped lines may suggest that a different schema could work better, or that some customization of the relevant schema is needed. The ‘Quick-check’ option can also be used at this stage, to spot-check for bad matchups, with particular attention paid to any custom columns – potentially saving time, compared to discovering such problems when the dataflow is in production.
6. Activate
In this final stage, the scheduling of the dataflow is set. You should consider the nature of your data; is it important to keep it up to date with hourly or otherwise regularly-scheduled runs, or is it enough to run it once per day - or even only this one time all together?
💡Example: When using Run every X Hours option, the scheduling of the run will not run 'on the dot', but rather will be offset based on when the Dataflow was first activated. In other words, if you set the Dataflow to run every hour, and activate it at 13:24, it will run at 24 minutes past each hour from then on. This helps prevent clustering which could otherwise cause the processing of the Dataflows to slow down significantly - and you can also use it to set a specific time for the Dataflow to run, should this be important.
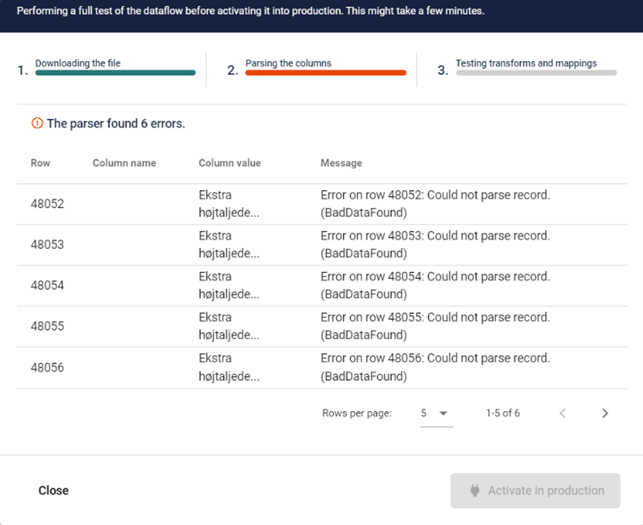
Once the dataflow is scheduled, all that remains is to run a test using the ‘Test and Activate’ button. This will perform a thorough test of the full file or the first ~10.000 rows (depending on the downloader type) and display the result of test. If you are happy with the result, you can click 'Activate', and the dataflow will go into production and run according to the schedule.
If there are any issues they will appear here, and likely require you to go back through the previous steps to correct them.
The ‘Accept data errors’ percentage slider can be set to indicate the tolerance for errors you will accept when your dataflow runs (the system will accept conversion errors in up to 40 % of the total amounts of rows). In the screenshot below, the percentage is set to five. It should always be a goal to have the percentage slider as low as possible to ensure you are ingesting the highest quality data possible.

⚠️ Warning: Accepted Errors Overrule for Person Identifiers. Note that if a row is encountered containing no Person Identifier the Dataflow will fail, regardless of the set Acceptable Data Errors percentage. As such, users are encouraged to use features such as the 'Clear invalid Emails' option or set valid Fallback Values for Person Identifier columns.
If the issue lies in the original source file, you will be informed of the exact rows that the problem arises from. Such errors will generally require you to correct them right at the source. Other, lesser problems can often be traced down to the previous step.
Assuming the test is passed, you will be able to select ‘Activate in production’ in order to put the dataflow into use in e.g. the CDP. Alternately, 'Run now and activate in production' can be selected from the same pop-up to put the new dataflow into immediate run-mode, after which point it will fall back on the set schedule.
Related articles:
Schemas & SourcesThe Dataflow Overview
Convert & Transform: A Detailed Breakdown