Having your Product Catalog connected to the Recommendation Engine has numerous benefits and utilities, enabling various parts of Raptor's systems to either work, or work better.
Web Recommendations utilize the Product Catalog to check for in-stock status, product category and price, and will automatically filter out products that are not in stock.
Email Personalization uses the Product Catalog to retrieve product images and website links for Email ads, as well as providing names, prices and so on for use in the Layout Designer.
Behavioral Triggers utilize the Product Catalog to check whether a given product should be pushed, by checking in-stock status, and retrieves the information that is sent to the customer from the Catalog - on top of many Trigges naturally being based on changes in the Product Catalog, such as price-drops.
Accomplishing this connection, meanwhile, is simply a matter of two quick steps. Read on below or take this interactive demo to learn how to do it.
💡If you use Merchandising, it is recommended to also set up a dedicated Product Catalog for the Merchandising destination. This allows you to define custom column names that are meaningful in the context of your campaigns, rather than relying on the fixed CustomField naming used by the Recommendation Engine schema. See the step-by-step guide.
1: Create a Source and Schema
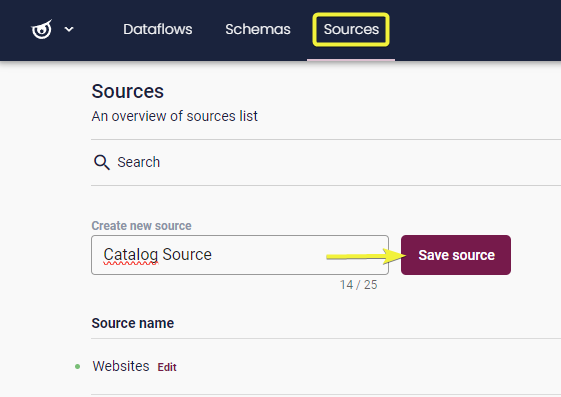
You will want to establish a dedicated Source for this purpose - so start in the Sources tab of Data Manager, and create a new Source with a suitable and easily-recognizeable name - for example, Product Catalog, Catalog Source or similar. Simply type this title in the Source name field and click on Save Source.
Nothing else needs to be done here, so continue to the Schemas tab, and click on the Create new schema button. In the resulting window, you will want to pick Recommendation Engine & Search in the Select destination platform drop-down. Then, in the Select schema drop-down, select Product Catalog. Finally, enter a name in the Schema Name field - and in this case, there is a highly specific recommendation: default. Various Web Recommendation modules references the Schema 'default' by... well, default. Using any name may thus necessitate otherwise-unnecessary edits to these modules, should you wish to use them.
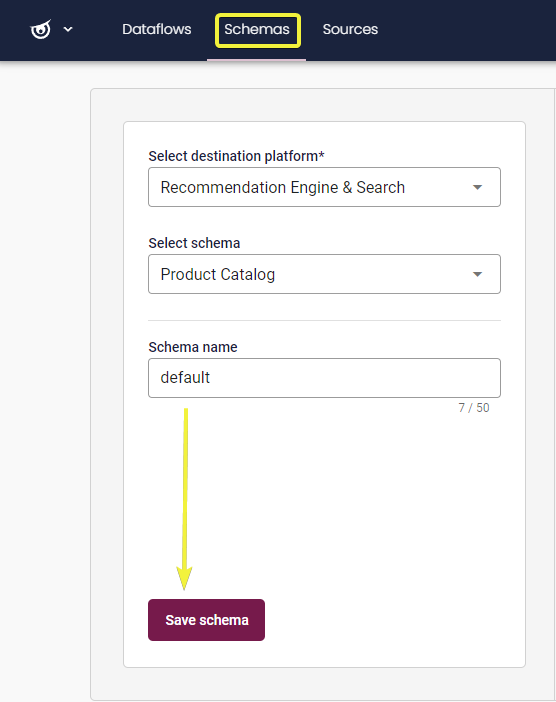
Since this type of schema is pre-set, there are no settings or customizations to make - simply click on Save Schema to create this as well.
2: Create a Dataflow
Now that these two prequisites have been met, it's time to combine them with your own Product Catalog and set it all in motion. In the Dataflows tab, click on the + Create new dataflow button. In the first step, General information, give the Dataflow an appropriate name and description, so that you can easily find it in the future. Below, in the Select source drop-down, select the purpose-made Source you created in Step 1, and in the Select destination platform drop-down beneath this, once again select Recommendation Engine.

With this, proceed to the Next step - Download. This is where you establish the link to your own Product Catalog. Various Connectors are available, but this will presumably be a HTTP option. So, simply select this, and enter the URL for your Product Catalog, then Validate & download before proceeding to the Next Step - File mapping. This part will generally be automated, so long as there is no issues with the source, so you will almost always be able to simply leave this all on the default, continuing to the Next step - Transform & Map.
Here, you need to select the + Add existing schema button. This will open a pop-up where you can Select source schema from a drop-down. Pick the Schema you created in Step 1, leave the name as default, and leave the Aggregation Mode box unchecked - simply clicking Add schema.

You will now need to map the various values in your Product Catalog (on the left) to the Schema column (on the right). The ProductName, ProductUrl and ProductNumber values are considered mandatory, and it is particularly critical that the ID you map to ProductNumber is the same one you use in the Website Tracking field of the same name - since this establishes a crucial connection between your Website Tracking and the Product Feeds.
Beyond just these mandatory datapoints, however, it is recommended that as many columns as possible are mapped. If you are unfamiliar with how the Dataflow system's basic Transform, Convert & Map features work, you may wish to peruse Introduction to the Data Manager and/or other associated guides first.

When you're done mapping the columns, select Next step - Activate. Here, as with any other Dataflow, you can select how often it should run - which, in this case, means how often the Recommendation Engine received an update on the state of your Product Catalog. In most cases, one daily run will be enough. At each run the existing product catalog will be overwritten by the new version.
You can also set an Error Margin, but if your Product Catalog is correctly formatted and mapped onto the Schema, you are unlikely to need more than one percent or so of leeway. When you are happy with these settings, click on Test and activate, and once the test is successfully completed, select Activate to put it into action.
With that, your Product Catalog has been linked, and will be accessible to the Recommendation Engine, for use in many of the features it provides!
FAQ
Q: What formats does the data manager support for Product Catalogs?
A: The data manager supports JSON, XML, and CSV formats for the Product Catalog ingest.
Q: How do I filter out specific products or categories from the output?
A: Using the Columns Filter option, simply select a parameter from the Product Feed that includes the product in question, and exclude it. For example, filter ProductNumber - Not Equal or ProductCategory - Not Equal, and input the specific product(s) you wish to remove.
Q: How do I remove products that are out of season, such as Christmas or Summer-specific goods?
A: Easily, as long as you include a 'Seasonal' column or similar in the Product Feed - then, it's just a matter of using the Columns Filter option, as explain in the previous answer.
Q: How do I filter out products that are Out Of Stock?
A: This depends somewhat on what values your Product Feed contains. If you have an 'In Stock' column with a yes/no value or similar, it can easily be converted into a Boolean - that is, binary - value, which you can then apply the Column Filter to. If you have a column for actual In-Stock numbers, it gets a touch more complicated, but still absolutely doable. You'll want to use the Transform & Convert option on the stock-number column, applying a 'Falsy' transformation and entering whatever the column shows for our-of-stock products - be it a 0 or a written 'out of stock' value. This causes any other value to be reduced to a 'True', effectively turning the stock-numbers into a binary - which can then be Converted into a Boolean in the next step, and filtered for.