How to send Legacy Buy-Data and POS Data to Recommendation Engine
Raptor's Recommendation Engine is a powerful tool, but for it to work its magic, it needs data - and lots of it. Both historical purchase-data and piping-hot Point-Of-Sale data is useful for feeding the algorithm, and the way to deliver this crucial fodder is the Orderline Schema. Using it, fortunately, is quite simple - a matter of two quick steps...
1: Create Orderline Schema
Within the Data Manager, head to the Schemas tab, and click on the Create new schema button. Within the Schema Creation Tool, you will need to Select destination platform - which, in this case, needs to be Recommendation Engine & Search. Making this selection opens up some new and different options when you Select schema - including Orderline. The Schema name is not too consequential, so you should simply name it something that's easy to remember, such as POS or simply Orderline.
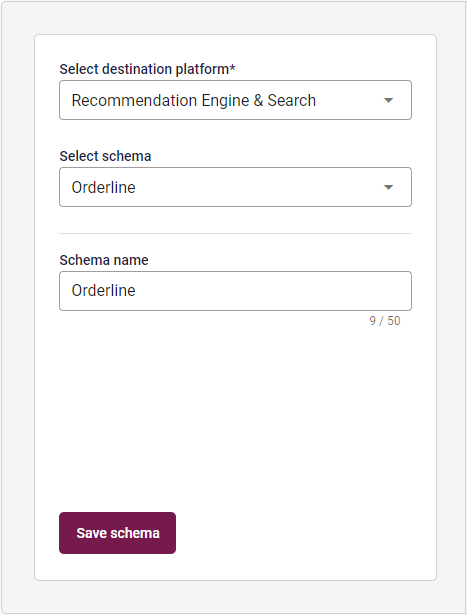
The Orderline Schema, unlike regular Schemas, cannot be edited or customized - it is designed for a uniform purpose, after all, and needs to be able to integrate smoothly with the Recommendation Engine. As such, there is nothing else to do but click on Save schema and finish the creation.
2: Create Dataflow
With your Orderline Schema in hand, head to the Dataflows tab, and click on Create new dataflow. Most of the process of setting this specific one up is no different than any regular old Dataflow - so, if you aren't familiar with this system, it is recommended that you take a look at Introduction to the Data Manager, which provides an in-dept guide to it. This guide will concern itself chiefly with the unique aspects of an Orderline Dataflow.
For example, in the General information step, it is important that you pick Recommendation Engine & Search in the Select destination platform drop-down. The rest is as normal, including the Source, which will likely depend on whether you're importing historical Buy-Data or setting up a POS pipeline. The Download and File mapping steps are also business-as-usual - for legacy Buy Data, you may want to download a HTTP document, while POS data is likely to arrive by FTP or similar, but there are many other supported options.
It is only at the crucial Transform & Map step that things become interesting again. Here, you will need to click on Add existing schema, and select the Orderline Schema you created in Step 1. Once you have added this Schema, you will be able to map the columns from your buy-data to the Schema Columns as usual, using the Combine, Transform and Convert tool - and you'll want to make sure ALL of the columns are mapped, in this case if at all possible, since any missing pieces will degrade the value of the data.
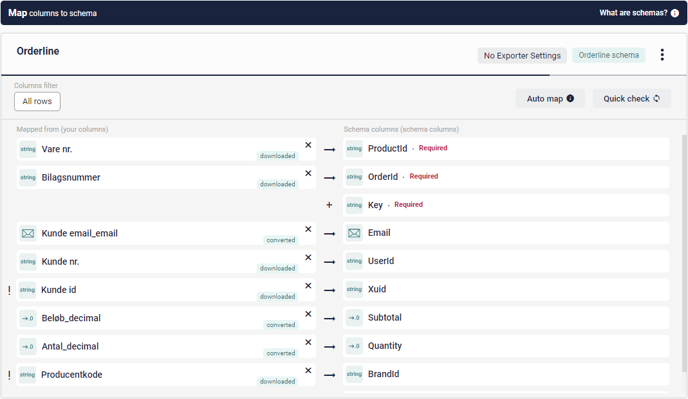
One unique requirement here, however, is the Key column. This needs to be mapped to a datapoint that is unique to each transaction. This feature serves the purpose of preventing the Recommendation Engine from being tricked by duplicate entries, which could otherwise lead to inaccurate results. If your dataset already contains a unique identifier for each purchase, excellent! Simply map that to the Key column, and you're golden.
If not, you'll have to create one using the Combine feature. Simply click on the Combine Columns button, and select two or more datapoints that, in combination, would be unique to a given purchase. For example, this could be an ItemID and a checkout timestamp - the source is ultimately irrelevant, so long as it's unique. Click past the Transform stage by selecting Skip Transformation, and arrive at the Combine-stage. You will now need to pick the order of the columns, but for the purposes of this particular exercise, this is actually irrelevant - the Key Generator is specifically set up to ensure that you can't accidentally create two 'unique' keys from the same datapoints by mixing up the order of the columns. So, just pick whatever order you like - it won't make a difference.
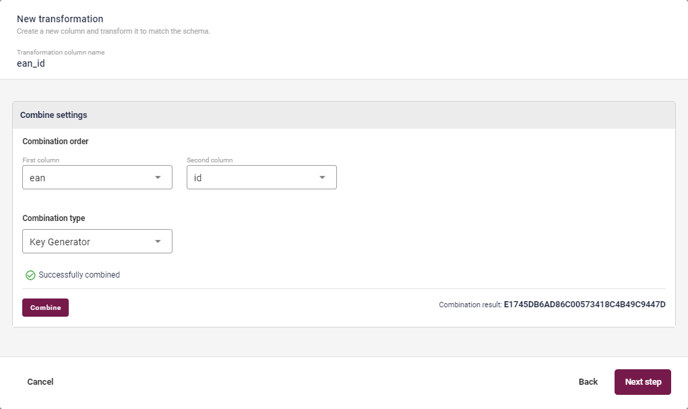
Finally, select the Key Generator Combination Type, and hit Combine before moving on to the final step. Here, you simply select String from among the various formats - right at the bottom of the drop-down -and hit Convert. You can now save your new Key as a Custom Column! Map the results to the Key column in the OrderLine Schema, and you're set.
Once you have mapped all the Required columns - and, preferably, all the rest too - you can proceed to the Activate step. This is mostly the same as ever, but the Scheduler is worth mentioning. If you're uploading a batch of legacy Buy-Data, you'll want to simply use the Run once option, while a Point-Of-Sale data pipeline will need to be run regularly, be it once per day using the Run daily at specific time option, or more frequently using the Run every option. Assuming you did it all right, you'll then be able to Test and activate the Dataflow, and put to to work.
🔍Note: Whether a single load of historical purchase-records or a regular drip of POS Data, the Recommendation Engine will devour is all gratefully - and return the favor with better suggestions and sharper customer targeting...